Overview
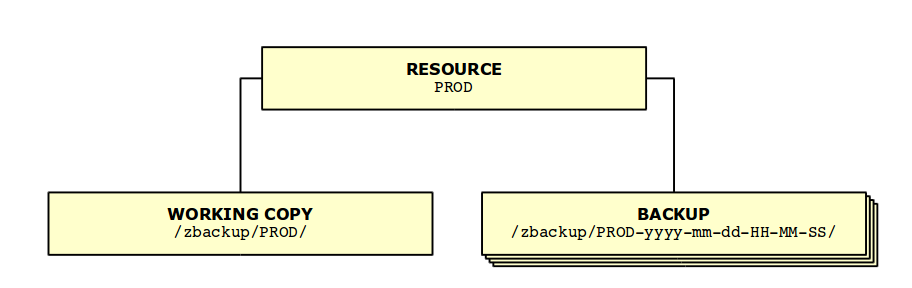
Backup Server can backup different resources, such as databases and virtual machines. It has extended support for Oracle and Microsoft SQL Server database backups. Each resource can have many backups, new backups are created periodically, e. g. once per day. Oldest backups are automatically deleted when system detects that deduplicated storage area is running of out space. Every resource always has one working copy. This is an exact copy of the production, except that it can have a few hours of time lag, by design. Different resources use different mechanisms to update their working copies. For example, Oracle Database resources use physical standby database to keep their state up to date.
Feature Comparison
Feature |
Light |
Standard |
Deja Vu |
Provide graphical user interface |
Y |
Y |
Y |
Export historical backups via NFS |
Y |
Y |
Y |
Export current standby database via NFS |
Y |
Y |
Y |
Perform full database backup in regular intervals |
Y |
Y |
Y |
Open historical backups in READ-ONLY mode |
Y |
Y |
Y |
Open Windows database instances in virtual environment |
- |
Y |
Y |
Open Windows database instances native on Linux |
- |
Y |
Y |
Requires additional Oracle Database license |
- |
Y |
Y |
Provide fixgap procedures |
- |
Y |
Y |
Open current standby in READ-ONLY mode |
- |
Y |
Y |
Open current standby in READ-WRITE mode in slot u0 |
- |
Y |
Y |
Upgrade to new minor version of Oracle Database |
- |
Y |
Y |
Open current standby in READ-WRITE mode in any slot |
- |
o |
Y |
Perform point-in-time recovery |
- |
o |
Y |
Open historical backups in READ-WRITE mode |
- |
- |
Y |
Create and host long-term test/acceptance databases |
- |
- |
Y |
Open historical backups with older database versions |
- |
o |
Y |
Upgrade to new major version of Oracle Database |
- |
o |
o |
Complete recovery until last committed transaction |
o |
o |
o |
Open completely recovered database in any slot |
- |
o |
o |
Additional database licenses are required because database instances are running on Backup Server. On the other side "Light" version of Backup Server is available with no licensing requirements and less features.
Light Edition
In this edition, instead of running physical standby databases on Backup Server hardware, we provide iSCSI targets to licensed Oracle servers that can run additional Oracle database instances.
Restriction of Light Edition is that Oracle Instances can not be opened on Backup Server hardware. However when a backup is required, a consistent RMAN backup is available via NFS.
Perfect Recall
This feature is available in standard Backup Server, but is not configured by default. This allows storing one copy of production redo logs on Backup Server. Therefore when production environment fails, database can be restored without any data loss, including last committed transaction.
Deja-Vu
Deja-Vu provides additional features to Backup Server when used to backup Oracle Databases. It requires an additional license and is not included in Backup Server by default. Additional features provided by Deja-Vu are most useful for application developers and testers.
Following restrictions apply when Deja-Vu is not installed on Backup Server:
-
Databases can only be opened in READ ONLY mode.
Exception is slotu0which allows only Current Standby to be opened in READ WRITE mode. All other backups can be opened in READ ONLY mode in slotu0. -
Point-in-Time recovery. All backups can be opened, but they can’t be recovered to a point-in-time between backups. Note that Backup Server periodically creates full backups. Default frequency of automatic periodic backup generation is once a day and it can be configured by Abakus.
-
Running acceptance and test databases on Backup Server. Clearly acceptance and test instances can be run in
u0slot, but automatic preparation scripts can not be used (to replace dblinks, change parameters, run updates, mask sensitive data, etc). This is not just a license limitation - Backup Server’s system resources have to be properly dimensioned for intended use (e. g. sufficient amount of RAM, CPU, etc). -
Completely recovered databases (recovered using current online redo logs from production) can be exported via NFS, but cannot be started in READ ONLY or READ WRITE mode on Backup Server.
High-Availability
All disks are mirrored, therefore a failure of one disk can be tolerated. Working copy with backups and Oracle archived logs are always stored in different volume groups. Deduplicated storage area may occasionally be unavailable for longer periods of time (up to a few days) due to maintenance (file-system checks). During this period archived logs are still being backed-up and physical standby databases are still being updated. A secondary Backup Server with identical content is supported as well (preferably at a different geographical location) so when one fails the other one continues to provide service.
User Interface
Login
Backup Server Control Panel is a web application which can be accessed by a web browser at the following URL address:
https://<hostname>:8443/backup-server/Where <hostname> should be replaced with the hostname or IP address of your Backup server. After successfully accessing Backup server’s web application a login form is displayed and user is prompted to enter username and password combination to log into the main part of Backup server user interface.
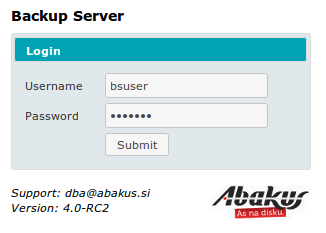
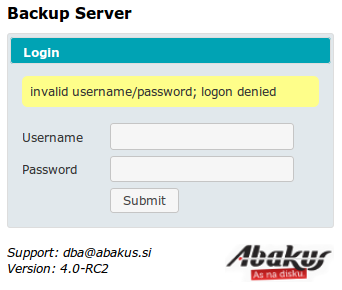
After entering username and password "Submit" button should be pressed to proceed with login procedure. If faulty login information is entered and submitted the following errors can be returned:
-
If either username or password is missing:
Username is mandatory.orPassword is mandatory.. -
If either username or password are incorrect:
invalid username/password; logon denied.
User Interface Structure
After a successful login main part of Backup server’s Graphical User Interface (GUI) is displayed.
Backup server’s GUI consists of multiple parts from top to bottom of the page:
-
General Backup server information and user menu at top of the page.
-
Notification area below the part showing general information.
-
Main area taking up most of the screen. Through this part of GUI main Backup server operations are performed.
-
Version information below the main area.
General information and menu

In the top left corner of the screen general information of the current Backup server is displayed. This information is displayed on all main GUI pages, it is not shown in pop-up windows. The information displayed stands for:
-
Backup Server
<BACKUP_SERVER_NAME>:-
<BACKUP_SERVER_NAME>- Backup server hostname
-
-
<NO_OF_BACKUPS>backups provide<NO_OF_DAYS>days of history since<START_DATE>:-
<NO_OF_BACKUPS>- total number of backups stored on Backup server -
<NO_OF_DAYS>- amount of days of history stored on Backup server -
<START_DATE>- date on which this Backup server has started collecting history for it’s oldest resource.
-
-
<LOGICAL_DATA_SIZE>GB of backup data is stored on<PHYSICAL_DATA_SIZE>GB /<TOTAL_PHYSICAL_SIZE>GB physical volume:-
<LOGICAL_DATA_SIZE>- logical size of all backups for all resources stored on Backup server -
<PHYSICAL_DATA_SIZE>- physical disk space consumed by all all backups for all resources stored on Backup server. This is significantly lower than<LOGICAL_DATA_SIZE>because of deduplication and compression -
<TOTAL_PHYSICAL_SIZE>- total physical disk space available on this Backup server
-
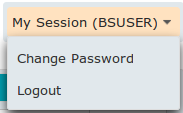
In the top right corner of the screen "My Session" menu is displayed. To the right of the word "My Session" username of the currently logged in user is displayed in brackets. When mouse pointer is hovered over the "My Session" button, a drop-down menu with two options is displayed:
-
"Change Password" - to change password for the current user.
-
"Logout" - to log out of the current session.
Changing user’s password
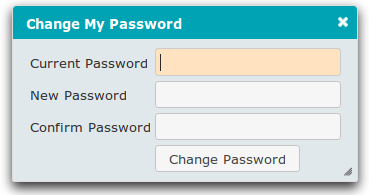
Clicking "Change Password" button in the "My Session" menu opens a new pop-up window called "Change My Password". To change password for the currently logged in user The following input fields should be entered correctly:
-
"Current Password" - current password for the current user.
-
"New Password" - new password for the current user.
-
"Confirm Password" - confirmation of the new password - this must match "New Password".
Confirm the inputs by pressing "Change Password" button.
Possible errors

If "Current Password" and "Confirm Password" don’t match the above error is printed out in the notification area. pop-up window is not closed. Reenter data correctly and confirm by pressing "Change Password" button.

Notification area
This area is populated only when at least one notification is present. Notifications can be anything from messages that indicate that something is being done, to warnings and critical faults. Different levels of notifications are represented with different colors:
-
Notification: blue.
-
Warning: yellow.
-
Critical: red.

Individual non system notifications can be dismissed by clicking the ![]() sign on the right side of each notification bar.
sign on the right side of each notification bar.
Main area
This part of GUI is used for most operations that are done with Backup server. By default list of Resources for the current user is displayed in this part of GUI after a successful login. More about user interfaces that are displayed in this part of GUI is explained in the following chapters of this user manual.
Version information

At the bottom of every page of user interface on the right side of the screen version of Backup server software is shown.
Resources

After successfully logging in expanded list of all available resources is displayed in the mail area. List of resources can be displayed in an expanded or collapsed mode. Expanded list of resources can be collapsed by clicking the ![]() button on the right side of the title row of the list of resources. On the expanded list of resources the row representing the selected resource is displayed orange. If a resource has opened slots text in is displayed in bold.
button on the right side of the title row of the list of resources. On the expanded list of resources the row representing the selected resource is displayed orange. If a resource has opened slots text in is displayed in bold.

When a resource is selected from the list, a list of available backups for this resource is shown. When a resource is selected, list of resources is collapsed as shown on the image above. Collapsed resources list is displayed as a single row showing the name of selected resource and a button ![]() that expands the collapsed list.
that expands the collapsed list.
When the list of resources is expanded the following properties are displayed for each of the resources:
- Type
-
-
database_oracle: Oracle Databases. -
database_mssql: Microsoft SQL Server databases. -
file_system: virtual machines or file systems. -
unknown: snapshots created manually. -
Internal: all saved incremental backups.
-
- Name
-
Name of the resource can be anything but should reflect the name of the database.
- Actual Date
-
Time and date of the data in the database.
- First Date
-
The date of the most recent backup. Note that new backups are usually created daily.
- Last Date
-
The date of the most recent backup. Note that oldest backups are deleted when backup server’s deduplicated storage starts running out of space.
- Status
-
It can have one of the following values:
-
PENDING: resource has not yet been successfully created, this status is present during resource creation process. -
ACTIVATING: while resource is transitioning fromPENDINGtoACTIVEstatus. This status is present during resource creation process and it can last up to a couple of hours. -
ACTIVE: resource is ready for use.
-
- Monthly Growth
-
Monthly growth of resource’s size on disk.
If text in a row representing a resource is bold at least one of the slots for this resource has ONLINE status.
Resource management
Is a user with administrative privileges is logged in, the following resource management options become available in the GUI:
-
creating new resources
-
editing existing resources
-
deleting resources
|
Note
|
Resource management is only available for administrators. |
Creating, updating and dropping resources
When logged in as administrator, list of resources offers some additional options:
-
link for creating new resource is available at the bottom right side of the expanded resources list (
 ).
). -
button
 for updating resource is displayed in the right most column of the expanded "Resources" table.
 -
button
 to open resource’s configuration editor. Clicking this button opens a new window called "Configuration Editor". Read more on how to use "Configuration Editor" in Configuration Editor chapter.
Clicking the "Create Resource" link or ![]() button opens new popup window called "Create or Update Resource".
button opens new popup window called "Create or Update Resource".
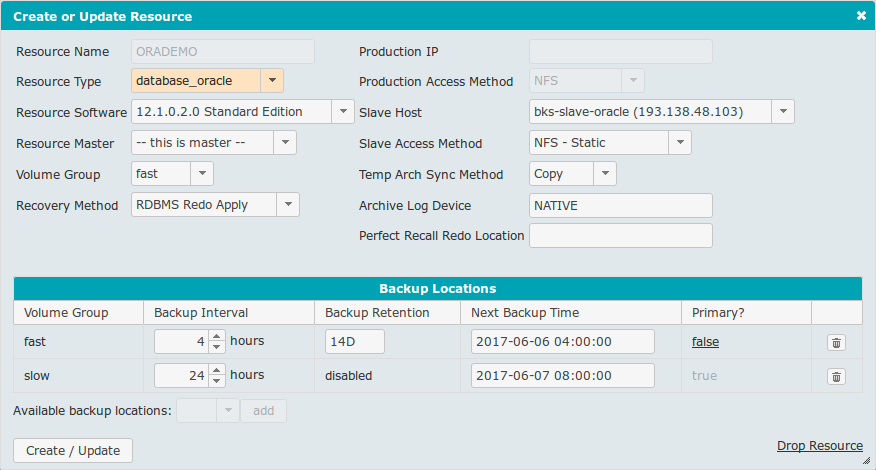
"Create or Update" window contains a secondary section called "Backup Locations". This section is only displayed when updating an existing resource and not while creating a new resource. "Create or Update" window consists of the following elements:
- Resource Name
-
Name of the resource.
- Resource Type
-
Dropbox for selecting type of the resource. Changing this option also changes values of the following fields: "Resource Software", "Slave Host", "Slave Access Method" and "Perfect Recall Redo Location". Two different values are available for type of resource:
-
database_mssql- for Microsoft SQL Server databases -
database_oracle- for Oracle databases
-
- Resource Software
-
Dropdown menu for selecting database software version for selected resource type. Each software version available for specific resource type has to be manually inserted by administrator via "Administration" interface which is explained in more detail in Software Tab chapter.
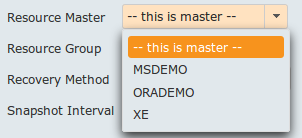
- Resource Master
-
Dropdown menu for selecting Master Server for resource. The following options are available:
-
-- this is master --- if this value is selected resource will use production databases archive log files to update its state. -
An existing resource - if an existing resource is selected as resource master, its own archive logs will be used to update resource’s state. Using this option actually creates another backup of the production database. This is useful when additional protection of production database data is required.
-
- Volume Group
-
Dropdown menu for selecting which volume group will be used for running the resource. Volume groups are pre-configured and can be changed only by support personnel.
- Recovery Method
-
Method used for applying changes to standby database. Only
RDBMS Redo Applyis available. - Production IP
-
IP address of production database server.
- Production Access Method
-
Access method used for accessing production database.
- Slave Host
-
Dropdown menu with a list of all available slave hosts that are able to run the selected resource type.
- Slave Access Method
-
Dropdown menu for selecting method used for accessing database on Backup server slave from Backup server master.
- Temp Arch Sync Method
-
Dropdown menu for selecting method used for synchronizing archive logs between production database server and Backup server. Two options are available:
-
Copy- slower but production archive logs remain intact. -
Move- faster, but production database has to be configured correctly to allow third party archive log deletion.
-
|
Note
|
If Move is used production database has to be configured accordingly.
|
- Archive Log Device
-
Value of this field defines how and where archive log files are stored. The following values can be used:
-
NATIVE: archive log files are copied using "CopyLogsPush" -
<FS>:<device>:<location>: archive log files destination:-
"FS": file system: currently only
ASMis supported -
"device": deivce Backup server presents and production host mounts (e.g. ASM or iscsi)
-
"location": path to archive log files (when using ASM this is the name of disk group e.g. +BSARCH)
-
-
- Perfect Recall Redo Location
-
Value of this field defines how and where redo log files are stored. The following values can be used:
-
NATIVE: redo log files are copied using "CopyLogsPush" -
<FS>:<device>:<location>: redo log files destination:-
"FS": file system: currently only
ASMis supported -
"device": deivce Backup server presents and production host mounts (e.g. ASM or iscsi)
-
"location": path to redo log files (when using ASM this is the name of disk group e.g. +BSREDO)
-
-
|
Note
|
This option is only available when "Resource Type" is set to database_oracle.
|
- Backup Locations
-
List of resource’s backup locations. Backup server’s basic functionality is to create and store backups. Backup can be stored in up to two different locations, namely volume groups. More about volume groups can be found in Volume Groups Tab chapter. Each resource can sotore its own backups in up to two deduplicated volume groups one slow and one fast. Information displayed in this table:
-
Volume Group: name of volume group assigned to the resource
-
Backup Interval: how often backups of resource will be created on volume group represeneted by the row. This value is set in hours. Is
0is configured, backups are disabled. -
Backup Retention: how long backup is retained on volume group. If this value is not set value of this field is displayed as
disabledmeaning that backups will be deleted according to the volume group free space requirement. Values must be entered as an intiger number followed by a letter representing units:-
"H" - hours
-
"D" - days
-
"W" - weeks
-
"O" - months
-
"Y" - years
-
-
Next Backup Time: time when next backup for this volume gorup will be performed. It is calculated automatically but it can also be entered manually.
-
Primary?: defines wheteher backup location is primary. Only one location can be primary. If backup location is not primary link with text "false" is displayed in this field. Clicking this link will make this location primary and others not. Usually this location is used for storing long backup history, so it is recommended to use volume group with large space capacity as primary. It is also recommended not to set "Backup Retention" for primary backup location so Backup server can manage available disk space optimally.
-
"Remove backup location" button (
 ): pressing this button removes backup location.
-
|
Note
|
"Primary?" is used when "Backup Interval" is set to 0 for this backup location to still privide backup functionality for a resource.
|
- Available backup locations
-
Dropdown menu for selecting available deduplicated volume groups and an "add" button (
 ) for adding the selected volume group to the list. If all available volume groups have already been assigned to the resource, these two elements are disabled.
 - Create / Update
-
Button for confirming resource creation or resource update. After a resource is created on Backup server, it has to be activated. More about activating resources can be found in Activating Resources chapter.
- Drop Resource
-
Link for dropping the resource that is being updated (
 ). This link is only enabled when updating an existing resource.
|
Warning
|
Clicking the "Drop Resource" link deletes the resource immediately without requesting any further confirmation! |
Activating resources
Each resource represents a database that is backed up by a Backup server. After creating a new resource on the Backup server, production resource has to be linked with that resource. This process is called resource activation. When a new resource is created and not yet linked with production database it is in PENDING state as displayed on the list of resources. Clicking on a row in the table of resources representing a PENDING resource will open new page that will allow resource activation.

After clicking PENDING resource page called "Pending Actions" is displayed.
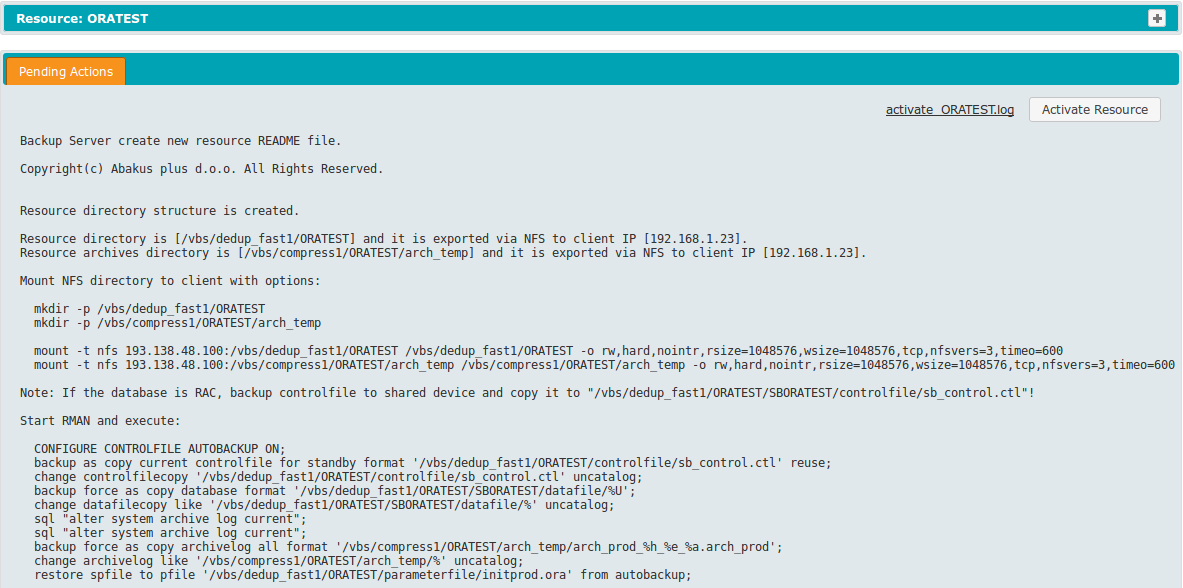
The following information is displayed on "Pending Actions" page:
- activate_<RESOURCE_NAME>.log
-
Link to text file with instructions on pending actions that have to be performed before activating a resource. Clicking this link will open a dialog window for downloading or opening a text file.
- Activate Resource
-
Button used to activate a resource after it has been successfully linked with the production database. This is the final step in the process of creating new resource.
- Textual instructions of Pending Actions
-
Before a resource is activated these actions have to be successfully performed. These actions place full backup of production database onto Backup server and enable archive log colleciton form production database to Backup server.
Configuration Editor
Each resource has certain properities that are invironment dependent and are transferred from production database to Backup server. These properities have to be different when database is running in different environments. Backup server is a different environment compared to production database. Therefore certain properities have to be changed when running databases on Backup server. Besides that some resources require certain post-startup actions to be performed after a virtual resource has been started. All these options can be configured using "Configuration Editor".
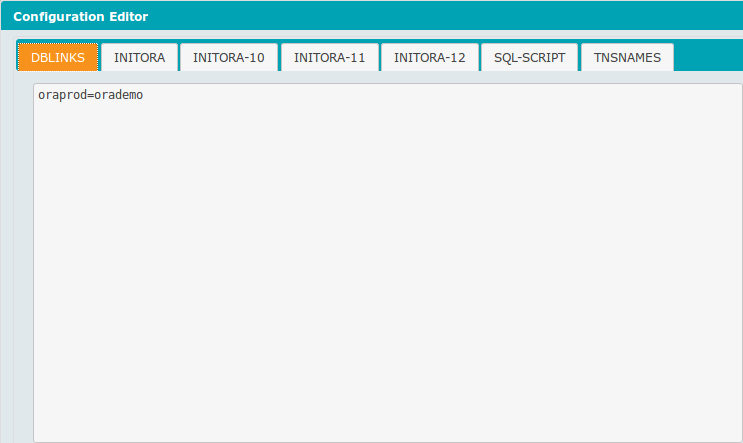
"Configuration Editor" can be started from three different locations of Backup server’s GUI and has different scopes of impact:
-
From Resource Types Tab of Administration Interface by clicking
button for a desired resource type. This configuration impacts all Virtual databases started from this type of resources. This is the most general level of configuration. -
From List of Resources while logged-in as administrator by clicking
button for a desired resource. This configuration impacts all Virtual databases started from this resource’s backups and snapshots. -
From Slots Tab by selecting a slot and clicking "Configure" button
 . This configuration impacts all Virtual databases started in this slot. This is the most specific level of configuration.
"Configuration Editor" can be used to configure various types of confgiuration located on different tabs in "Configuration Editor" window:
-
"DBLINKS": Only for
database_oracleresources. This configuration is used to alter ionformation regarding database servers hostnames so that virtual databases started on Backup server do not connect to their production databases and change their contents. The syntaks for this configuration is<old_hostname>=<new_hostname>and each row can have one record like this. -
"INITORA", "INITORA-10", "INITORA-11", "INITORA-12": Only for
database_oracleresources. Different verisons of Oracle databases have different initialization configuration parameters, therefore "Configuration Editor" has different "INITORA-" configurations. These are standard Oracle database initialization parameters that are usually written in "init.ora" files. A lot of information on Oracle initialization parameters configuration and configuration samples can be found on Internet. -
"SQL-SCRIPT": Available for
database_oracleanddatabase_mssqlresources. These are SQL scripts that are run after a virtual database has been opened on Backup server. -
"TNSNAMES": Only for
database_oracleresources. Because standby databases that are running on Backup server hosts are running on different servers than production databases those server’s hostnames are different. With this configuration option TNSNAMES aliases can be reconfigured to reflect databases running in Backup server environment. The syntax of this configuration reflects and is the same as Oracle’s local naming parameters stored in TNSNAMES.ORA files. A lot of information on Oracle initialization parameters configuration and configuration samples can be found on Internet.
Configurations can be written on different levels and have different scope of impact. Same configurations can be defined on resource type, resource and slot level. How does this affect the virtual database started in a slot:
-
"DBLINKS" and "INITORA-*": when defined on different levels logical union of configurations is performed and applied to the virtual resource.
-
"SQL-SCRIPT" and "TNSNAMES": when defined on different levels the most specific level of configuration is used.
Button  saves the configuration of "Configuration Editor".
Backups Tab
After selecting a resource as described in List of Resources chapter, time-line displaying all backups and snapshots for the selected resource is shown.
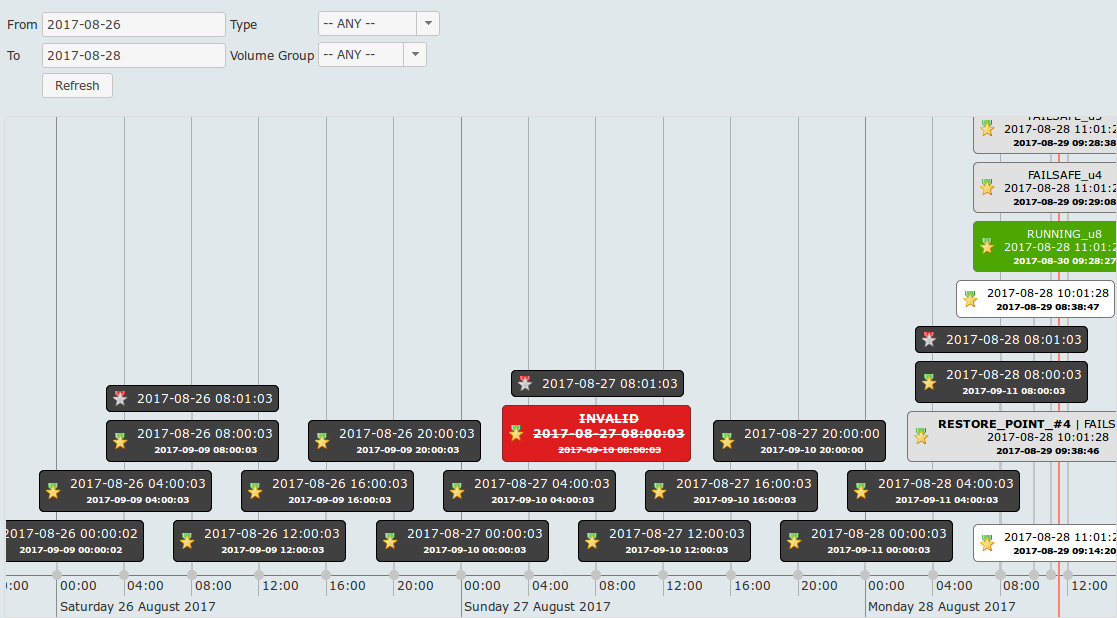
This tab displays backups and snapshots on a time-line. The most important difference between backups and snapshots stored in a Backup server is in what Backup server allows users to do with them. Backups are automatically periodically generated, always consistent and protected against any change. They are the source for restoring the production database and are the origin for all snapshots. Of course snapshots can be created from other snapshots, but they originate from one of the backups. While backups are protected, on the other hand snapshots can be changed and deleted.
There is a form above the graph that allows users to control time-line time parameters and filter what is displayed on the time-line:
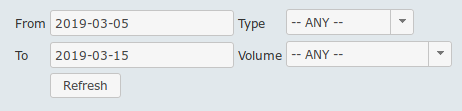
The amount of time displayed on the time-line and the desired period can be set using:
-
Set "From" and "To" dates to select a period and click "Refresh" button to display the selected period. The "Refresh" button can be used to refresh the changes of time-line (new, deleted or changed backups).
|
Note
|
clicking "Refresh" button will not reset the values of "From" and "To" fields, they have to be reset manually or by reloading the web page. |
-
Mouse: scroll mouse wheel up to narrow the time period and down to widen it (note that time-line will narrow or widen to or from the position of the mouse cursor). With the left mouse button grab and move the time-line back and forth in time is possible.
|
Note
|
clicking "Refresh" button will reset the view set with the mouse. |
|
Note
|
Vertical line on the right-most side of the time-line represents the current time. |
-
Dropdown menu "Type" to select which types of snapshots are displayed:
-
-- ANY --: all types -
BACKUP: only backups -
SNAPSHOT: only snapshots "Refresh" button has to be clicked to reflect the desired time-line display parameters.
-
-
Dropdown menu "Volume" to select only snapshots that are stored on a specific volume. "Refresh" button has to be clicked to reflect the desired time-line display parameters.
Each backup is represented by a rectangle on the time-line. Horizontal rectangle position represents time and date of the backup’s data. Each rectangle has a vertical line coming from the middle of it’s bottom border and stretching down to the time axis exactly to date and time of this backup. Each rectangle contains an icon representing Disk Volume this backup is located on. More on Disk Volume management can be found in Disk Volumes Tab chapter. Additional information about a backup is represented by the colour and the text inside the rectangle.

Each rectangle can have up to 3 lines of text:
-
First line is not always present and represents name of the snapshot.
-
Second line is time and date of snapshot data. This line is always present.
-
Third line represents time and date until snapshot will be present on Backup server. After this time, snapshot will be automatically deleted from Backup server’s disks. This line is only present when persistent until is set or is automatically set.
Rectangles are of different types which is also represented by the colour their colours:
-
Dark Grey: Automatically generated periodical backups that can not be changed. This is the part of backup server is most protected against change and deletion. The reason for this is that backup server is always able to provide data that users can restore their database from.
-
White: these snapshots are called NORMAL snapshots and are generated automatically when virtual databases are being opened or by using "Create Snapshot" action via "Backup Details" window. This is described in more details in Create Snapshot chapter. When virtual database is restored to a consistent state a NORMAL snapshot is created. NORMAL snapshots can be used as starting points to again start virtual databases from the same point in time as before without the need to restore the database.
-
Green: RUNNING snapshots are snapshots that virtual databases are currently running from. RUNNING snapshots can not be deleted. Each virtual database is started in one of the available slots. Name of the slot in which virtual database from this snapshot is running in is displayed besides the word RUNNING. E. g.
RUNNING_u9means that virtual database is running in slot "u9". -
Light Grey: Snapshots with light grey background can be of two types depending on the colour of text in the rectangle:
-
Black text: FAILSAFE snapshots. When closing a virtual database a snapshot is automatically generated which is stored for three days by default. The period of FAILSAFE snapshot retention can be changed manually as described in the Closing Slots and Stopping Virtual Databases chapter. Each virtual database is started in one of the available slots. Virtual database that this FAILSAFE snapshot belongs to was running in a slot. Name of this slot is displayed besides the word FAILSAFE. E. g.
FAILSAFE_u1means that virtual database was running in slot "u1". -
Red Text: During the process of starting a virtual database snapshots are being used. While they are being used they are protected against deletion and virtual databases can not be started from them. This status is temporary.
-
-
Red: Backup or snapshot represented by this rectangle has been manually marked as failed as described in Backup Details chapter.
Backup Details
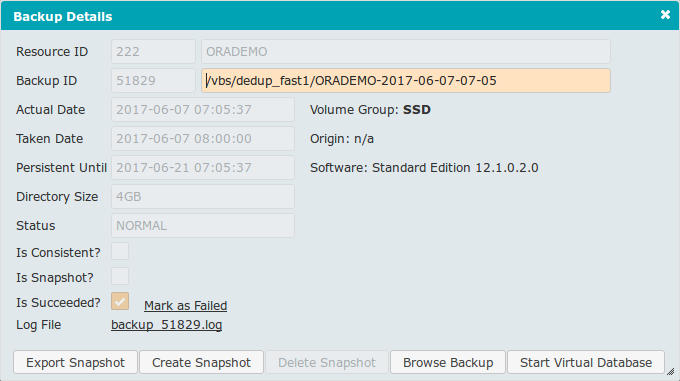
Left-clicking on a rectangle representing a backup or a snapshot opens a new pop-up window displaying selected backup or snapshot details. Different information is displayed for different types of resources. The following information and options are available:
- Resource ID
-
This line consists of two fields showing information about the resource this backup or snapshot is originating from. First field contains resource’s unique identifier and the second one contains resource’s name.
- Backup ID
-
Consists of two fields. The first one contains selected backup’s unique identifier and the second one shows path to files of the backup.
- Actual Date
-
Date and time of the data in this backup or snapshot.
- Taken Date
-
Date and time when the backup or snapshot has been successfully written to Backup server.
- Persistent Until
-
Date and time until this snapshot will be kept on the Backup Server. After that time snapshot will be deleted from the Backup server. If this field is not set, corresponding snapshot or backup will not be removed from the Backup server. This field is not set for all backups because they are protected against deletion.
- Directory size
-
Backup directory logical size. Physical size is typically smaller because data is deduplicated. If this backup were restored to the production environment it would take up this amount of space.
- Status
-
See Backups Tab chapter.
- Is Consistent?
-
A checkbox that marks whether a backup or snapshot is consistent or not.
- Is Snapshot?
-
A checkbox that marks whether the selected item is a backup or a snapshot. Only automatically generated resource backups are not checked "Is Snapshot", all other items are.
- Is Succeeded?
-
A checkbox that marks whether a backup or a snapshot has been created successfully.

- Mark as Failed / Mark as Succeeded
-
A link to mark selected snapshot or backup as failed. When backup is marked as failed it will be displayed in a red rectangle with strike-through text as shown in the last row of "Backup and snapshot statuses" table in Backups Tab chapter.
If a backup or snapshot is already marked as failed, then this link is called "Mark as succeeded" and clicking it will render the rectangle representing this backup or snapshot in its according color and information representing its status. - Log File
-
In some cases periodic automatic backups have log files and in those cases here a link is displayed that allows downloading this log file. Some backups don’t have log files and in those cases the value of "Log File" is
unknown. - Volume Group
-
Description of the volume group that this backup is stored on.
- Origin
-
Unique identifier of the backup or snapshot that the selected snapshot was created from. Automatically generated resource backups don’t have a backup or a snapshot as its origin. In those cases the value of this parameter is
n/a. - Software
-
Version and edition of the database for the selected backup or snapshot.
- Export Snapshot
-
This button opens a new window called "Export Snapshot". This is used to export files belonging to selected snapshot or backup via NFS or SMB to a specific client computer. Read more in Export Snapshot chapter.
- Create Snapshot
-
This button opens a new window called "Create Snapshot". This is used to crate a new snapshot of the slected snapshot or backup. Read more in Create Snapshot chapter.
- Delete Snapshot
-
Clicking this button deletes the selected snapshot. This button is disabled for:
-
all backups, because they are protected against deletion;
-
all snapshots with status
USED; -
all snapshots with status
RUNNING.
-
- Browse Backup
-
This button opens a pop-up window that allows the user to browse through the selected backup’s files.
- Start Virtual Database button
-
Opens a pop-up window that allows the user to open a virtual database originating from the selected backup or snapshot. This button is disabled for snapshots with status
USED. More about starting virtual databases can be found in Starting Virtual Databases chapter.
Backup Details pop-up window can be closed by clicking the ![]() sign in the top right corner of the pop-up window.
sign in the top right corner of the pop-up window.
Export Snapshot
Each snapshot’s files can be exported via SMB/CIFS or NFS protocol and made accessible to a specific computer. "Export Snapshot" window is used to perform this procedure. List of all currently exported snapshots can be accesed via "Exports Tab" which is explained in more datails in Exports Tab chapter.
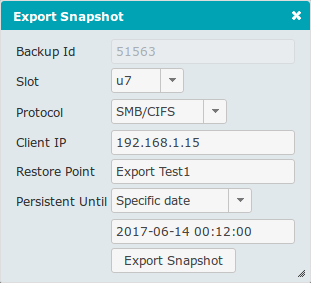
Export Snapshot window consists of following items:
- Backup ID
-
Unique identifier of a snapshot whose files will be exported. Value of this field can not be altered.
- Slot
-
A dropdown menu for selecting an available slot that will be used to contain exported files. More about slots can be found in Slots Tab chapter.
- Protocol
-
Dropdown menu for selecting protocol to be used to export snapshot’s files.
SMB/CIFSorNFScan be selected. - Client IP
-
IP Address of client computer that this export will be made accessible to. This parameter is mandatory.
- Restore Point
-
Optional parameter for entering a custom restore point name so this restore point can be easily identified.
- Persistent Until
-
Each export can remain on Backup server until specifically designated time or until volume group that this export will be stored on starts running out of space. Dropdown menu offers two possibilities:
-
Specific date: export will be deleted at a spectific time which has to be entered using the field below this dropdown menu. -
Space permits: export will be deleted automatically by Backup server’s house-keeping alogrythms when volume group that holds export’s files starts running out of space.
-
- Export Snapshot
-
Button to start the process of exporting snapshot.
Create Snapshot
Backup server allows creating new snapshots from existing snapshots or backups. "Create Snapshot" window is used to perform this procedure.
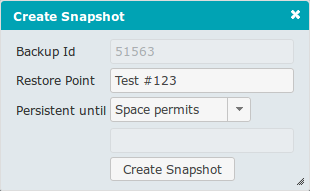
Create Snapshot window consists of following items:
- Backup ID
-
Unique identifier of a snapshot whose files will be exported. Value of this field can not be altered.
- Restore Point
-
Optional parameter for entering a custom restore point name so this restore point can be easily identified.
- Persistent Until
-
Each snapshot can remain on Backup server until specifically designated time or until Backup server starts running out of space. Dropdown menu offers two possibilities:
-
Specific date: snapshot will be deleted at a spectific time which has to be entered using the field below this dropdown menu. -
Space permits: snapshot will be deleted automatically by Backup server’s house-keeping alogrythms when Backup server starts running out of space.
-
- Create Snapshot
-
Button to start the process of crating snapshot.
Slots Tab
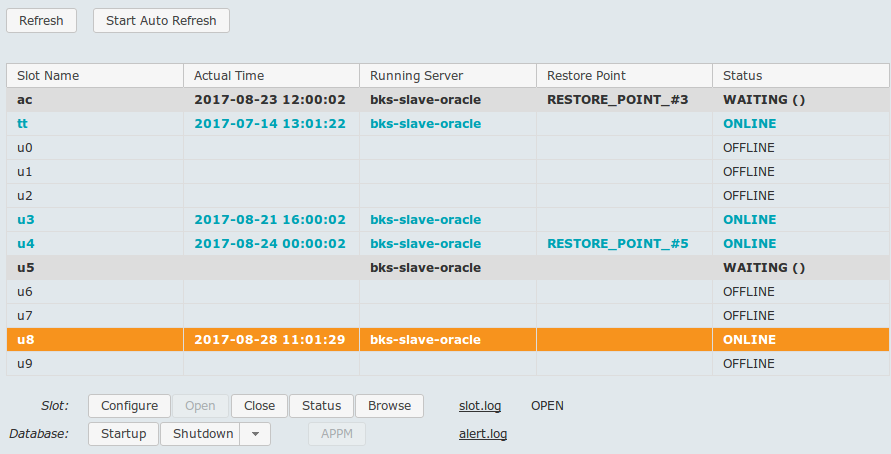
This tab displays a list of slots in which virtual databases can be opened. Slots represent physical and logical resources on Backup server that may be used for starting a database from the history stored on Backup server. For every resource 12 slots are available. First two slots are called ac and tt, the following are called u0 .. u9. Functionally all slots are identical and different naming does not change any slot characteristics. Slot called ac is commonly used for acceptance testing and slot called tt for test databases.
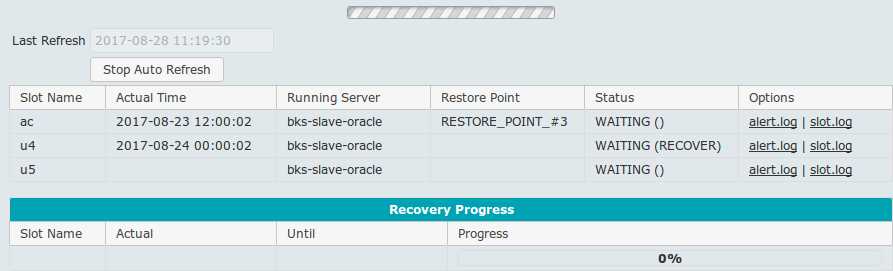
Slots tab has two modes, the normal mode displaying the list of all available slots for the selected resource and the "Auto refresh mode" that shows only slots that have status WAITING meaning they are currently opening or closing. Auto refresh mode constantly refreshes and displays the most current status of slots that have status WAITING. There is an animated progress bar like graphical element displayed in the auto refresh mode. This element is present to indicate that user interface is responsive.
When entering slots tab or after starting or stopping a virtual database slots are automatically displayed in auto refresh mode. To exit the auto refresh mode and enter normal mode "Stop Auto Refresh" button must be clicked. Auto refresh mode can only be entered when at least one of the slots has WAITING status. If this is true then a button "Start Auto Refresh" is enabled in normal mode. Clicking this button exits normal and enters auto refresh mode.
Normal mode
Normal mode enables manual refresh by clicking the "Refresh" button just above the list of slots.
For each slot in the list in the normal mode the following parameters are displayed in the table:
- Slot Name
-
Name of the slot
- Actual Time
-
Actual time of the database opened in this slot
- Running Server
-
Virtual database in this slot is running on this server.
- Restore Point
-
Virtual database running in this slot was started from this Restore Point.
- Status
-
In this column current status of the slot is displayed. Slot statuses change especially during the procedures of opening and closing slots. Slot status values:
-
OFFLINE: Slot is closed and ready for use. It can be opened and a virtual database started in it. -
ONLINE: Slot is open and a virtual database is running in it. -
WAITING: Slot is in the process of opening or closing and waiting for an operation to finish. If status waiting persists for a long time then something might of went wrong with this slot. In such a case this slot can be closed and reopened. -
INVALID: Slot was in the process of opening or closing and during that operation a failure happened. This king of slot should be closed and reopened. If this state repeats for various slots and for more that one opening, support should be contacted.
-
An individual slot can be selected from the list by clicking on it with the left mouse button. When a slot is selected the row in the list of slots representing this slot is colored orange. After a slot has been selected additional buttons become available beneath the list of slots:
- Configure
-
Button that opens a window called "Configuration Editor". More on confguration editor can be found in Configuration Editor chapter.
- Open
-
Button that is enabled when selected slot has status
OFFLINE. Clicking this button opens "Start Virtual Database" pop-up window. More about starting virtual databases can be found in Starting Virtual Databases chapter. - Close
-
Button is enabled when the selected slot has status different from
OFFLINE. Clicking this button opens a pop-up window called "Close Slot". The procedure of closing an open slot and stopping virtual database is described in Closing Slots and Stopping Virtual Databases chapter. - Status
-
A button that is enabled when status of the selected slot is "ONLINE". It opens a pop-up window displaying information about the selected slot. More about slot status can be found in Slot Status chapter.

- Browse
-
A button that is enabled when status of the selected slot is
ONLINE. It opens a pop-up window with called "File Explorer" that enables browsing and downloading virtual database’s file-system. More about using file explorers can be found in the File Explorer chapter.
- Startup
-
A button that is enabled when status of the selected slot is
ONLINE. Clicking this button starts procedures that try to start virtual database opened in this slot. Progress of these procedures can be monitored by clicking "alert.log" link. - Shutdown
-
A button with a dropdown menu that is enabled when status of the selected slot is
ONLINE. Clicking this button starts procedures that try to stop virtual database opened in this slot. Progress of these procedures can be monitored by clicking "alert.log" link.-
Shutdown ABORT: shuts down virtual database in this slot by force.
-
- slot.log
-
Clicking this link opens a new pop-up window displaying the selected slot’s log file. More about log viewer pop-up window can be found in Log Tail chapter.
- alert.log
-
Clicking this link opens a new pop-up window displaying system log file. More about log viewer pop-up window can be found in Log Tail chapter.
- Slot database status
-
Status of virtual database in currently selected slot. This status dynamically changes when a different slots are selected from the list. When determining status of a database an actual database client is used. Possible values:
-
n/a- slot is not active. -
OPENorONLINEif database in selected slot is curently running and connection to it is possible. -
unknownwhen unable to determine database status. Sometimes database client fails to determine database status in time provided. In these cases click the desired slot again to try to determine database status again. -
UNKNOWNwhen database in currently selected slot is offline. -
*** loading ***in the process of determining slot status.
-
Auto refresh mode
Auto refresh mode is used for displaying current statuses of slots that are in WAITING state and the progress of virtual database recovery process. Above the list of slots there is a "Last Refresh" field showing the time of the last refresh. This page is automatically refreshed every 5 seconds and value in "Last Refresh" field is updated accordingly.
The list of slots in auto refresh mode shows the same slot attributes that are displayed in normal mode and it has an additional column with links to slot.log and alert.log for the slot represented by the current row. More about slot.log and alert.log can be found in Normal mode chapter. An individual row representing a slot can not be selected in the auto refresh mode.
Auto refresh mode has no buttons for manipulating selected slots. Those can only be found in normal mode.
Recovery Progress
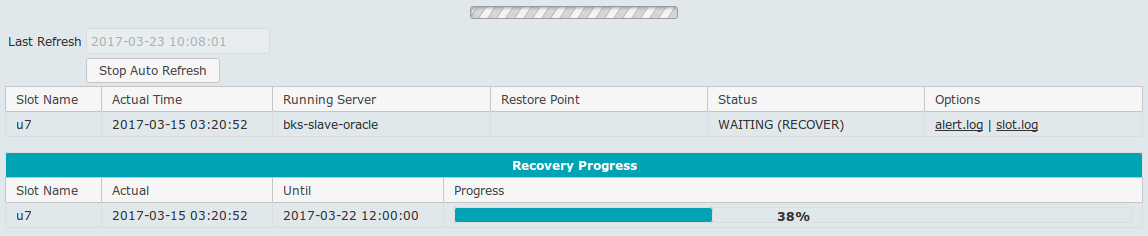
Each virtual database has to be recovered to consistent state before it is opened. The process of recovering a database can be quite lengthy especially when databases have to be recovered for a longer period of time meaning that more changes have to be applied. Because of this, each time an individual slot enters its recovery stage, a progress bar is displayed in auto refresh mode, showing the progress of recovery process for each individual slot that is in recovery state. Each slots that is in the recovery stage is displayed as a row in a table called "Recovery Progress" just below the list of slots. "Recovery Progress" table show the following information for each slot in recovery stage:
- Slot Name
-
Name of the slot that this row in "Recovery Progress" table represents.
- Actual
-
Time of the data in the virtual database that is being recovered. This value changes as the recovery process moves forward.
- Until
-
Time until which the virtual database will recover that was entered in the "Recover Until" input field of the "Start Virtual Database" pop-up window.
- Progress
-
Visual representation of the progress of recovery process.
|
Note
|
Each time a virtual database is starting it has to be recovered to a consistent state. This happens even when starting a virtual database from resource’s standby database. In such cases the process of recovery is very short, but it exists. In such cases "Recovery Progress" is displayed but in some cases it is so short that it does display just a row in "Recovery Progress" table without any additional information, which is normal behavior. |
Slot Status
This pop-up window displays detailed status of a slot. As databases are opened in different ways, Slot Status pop-up windows display different information. The parameter that affects what type of "Slot Status" pop-up window is displayed is "Access Method" in "Start Virtual Database" pop-up window when starting a virtual database. More about how virtual databases are started can be found in Starting Virtual Databases chapter.
There are three different types of "Slot Status" pop-up window, depending on which "Access Method" was selected. Individual types are described below.
TNS or TDS Slot Status pop-up window
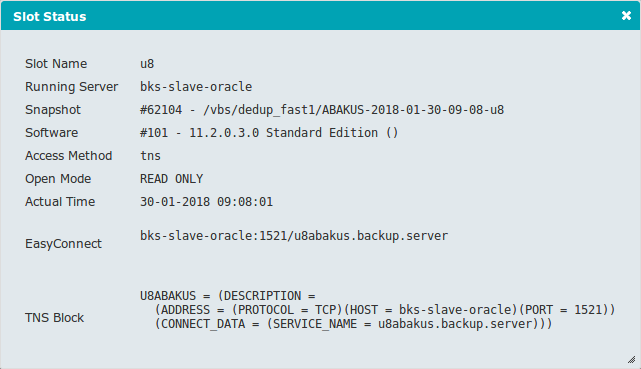
This type is displayed if TNS - Oracle Listener Service or TDS - Microsoft SQL Connection was used as "Access Method" when starting virtual database. The following information is displayed:
- Slot Name
-
Name of the selected slot.
- Running Server
-
Hostname or IP address of the server running the database started in this slot.
- Snapshot
-
SNAPSHOT ID - PATHwhere snapshot ID stands for ID of the snapshot used to create selected slot. Path represents Backup server’s file-system path to the files belonging to selected slot. - Software
-
SOFTWARE ID - VERSION EDITION (). These values represent software information about the database running in selected slot as they are set in "Software Tab" which is explained in more datail in Software Tab chapter. - Access Method
-
Access method used while starting virtual database in this slot.
- Open Mode
-
Mode in which virtual database in this slot is opened.
Actual Time Point in time for data in virtual database started in this slot.
- EasyConnect
-
A string for connecting to virtual database started in this slot. This is only available when virtual database is started with "TNS - Oracle Listener Service" access method.
- TNS Block
-
Alternative string for connecting to virtual database started in this slot. This is only available when virtual database is started with "TNS - Oracle Listener Service" access method.
NFS Slot Status pop-up window
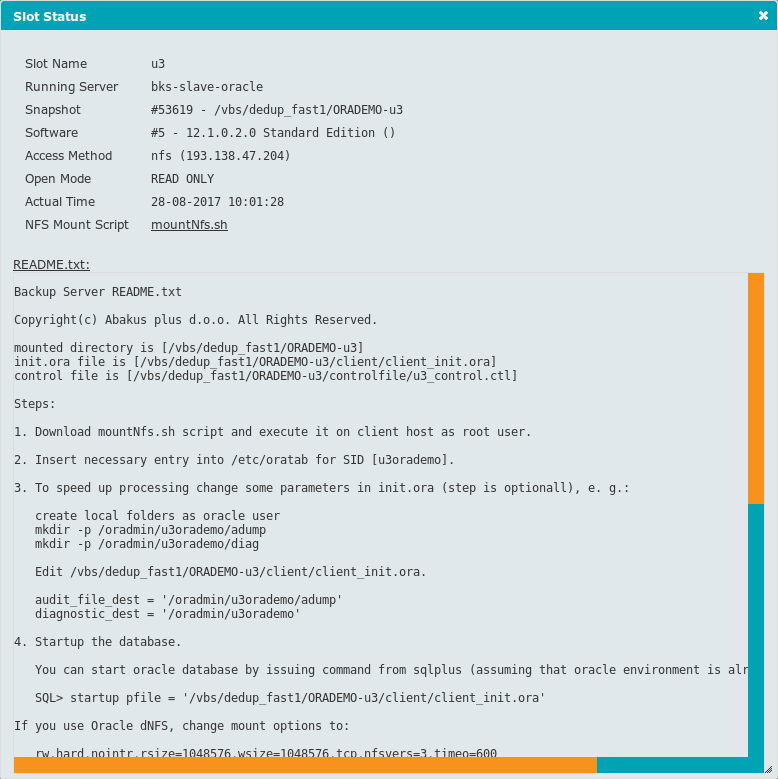
This type is displayed if NFS - Network File System was used as "Access Method" when starting virtual database. Only information that is not described in the previous Slot Status Types is described:
- Access Method
-
In addition to the information about access method used to start virtual database in this slot, IP address of the client computer to which this NFS export has been made available is displayed in brackets. Backup server will not allow clients using different IP addresses to connect to this NFS export.
- NFS Mount Script nfsMount.sh
-
Link to automatically generated script for connecting to exported NFS directory containing database files. Script can be downloaded by clicking the link.
- README.txt
-
Link to text file containing instructions on how to use virtual database opened in this slot.
- Block displaying README.txt text file contents
-
The same instructions as in previous point displayed within "Slot Status" pop-up window.
SMB Slot Status pop-up window
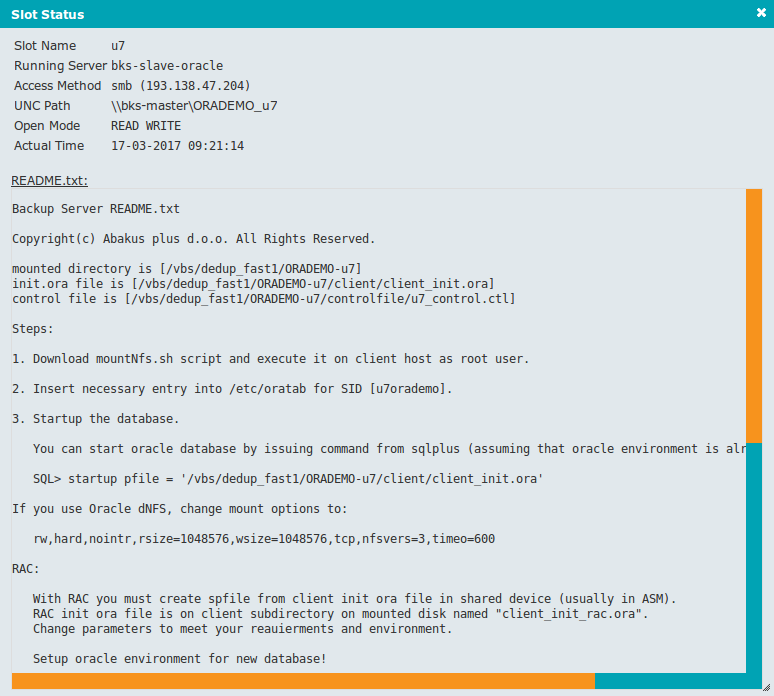
This type is displayed if SMB - Windows File Sharing was used as "Access Method" when starting virtual database. All information displayed in this type of Slot Status pop-up window is already contained in previous descriptions of other types of Slot Status pop-up windows.
Closing Slots and Stopping Virtual Databases
Virtual databases can be closed by closing their slots. A slot belonging to a virtual database is a slot that was used for starting the database.
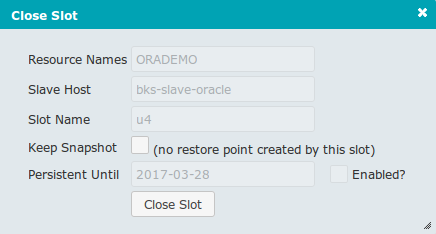
Clicking Close button in Slots Tab for a selected slot, opens a pop-up window called "Close Slot". This window is used for closing the selected slot and the virtual database running in this slot. The information displayed in this window:
- Resources Name
-
Names of resources for which virtual databases are opened in this slot.
- Slave Host
-
Hostname of the computer where virtual database is running.
- Slot Name
-
Name of the slot that is being closed.
- Keep Snapshot
-
Each time a slot is closed a FAILSAFE snapshot is created automatically. This snapshot will persist on the Backup server for three days, but users can choose to create a FAILSAFE snapshot with custom persistence. If this checkbox is checked persistence of the FAILSAFE snapshot is not automatically determined and "Enabled?" checkbox is enabled.
|
Note
|
If slot is closed with this checkbox checked and checkbox "Enabled?" unchecked, generated FAILSAFE snapshot will be persistent forever or until Backup server starts running low on disk space, when it will be deleted automatically. |

- Persistent Until
-
This input field is enabled when "Keep Snapshot" and "Enabled?" checkboxes are checked. If date is entered in this field, automatically generated FAILSAFE snapshot will be persistent on Backup server until the entered date. To enable this input field checkbox "Enabled?" has to be checked.
- Enabled?
-
This checkpoint is used to enable manual restore point generation. To enable this checkpoint "Keep Snapshot" checkpoint has to be checked.
- Close Slot
-
Clicking this button starts the process of closing the selected slot.
Close Slot pop-up window can be closed clicking the ![]() mark in the top right corner of the pop-up window.
mark in the top right corner of the pop-up window.
Starting Virtual Databases
Backup server with Deja-Vu enables running virtual databases from data stored in backups and snapshots in slots provided by Backup server. The procedure of starting a virtual database can be initiated from two locations, from a selected backup or snapshot, or from a selected slot. Depending on where virtual database is started from different options are available.
From Backup or Snapshot
This method allows opening virtual databases only from historical backups meaning that current standby database can not be used as a source of data for the virtual database. It is initiated from Backups tab which is described in Backups Tab chapter. This method is better for when virtual database has to be started from exact version (age) of the data for a certain resource. If users know what backup or snapshot they want to use for opening a virtual database, this method provides them a more elegant way of opening a virtual database with exactly the data they need.
First an originating backup or snapshot must be selected:
-
On the Backups timeline locate a backup or a snapshot that will serve as origin of the data for a virtual database that will be started as described in the Backups Tab chapter.
-
Left-click the located backup or snapshot - this opens a new pop-up window called "Backup Details". More information on "Backup Details" pop-up window can be found in Backup Details chapter.
-
Left-click button "Start Virtual Database" in the "Backup Details" pop-up window. This opens a new pop-up window called "Start Virtual Database"
By default "Start Virtual Databse" window opens in its basic mode offering fewer options. To open its advanced mode button  has to be clicked.
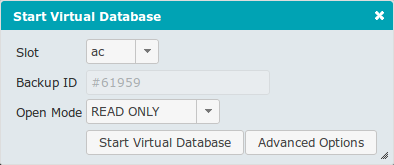
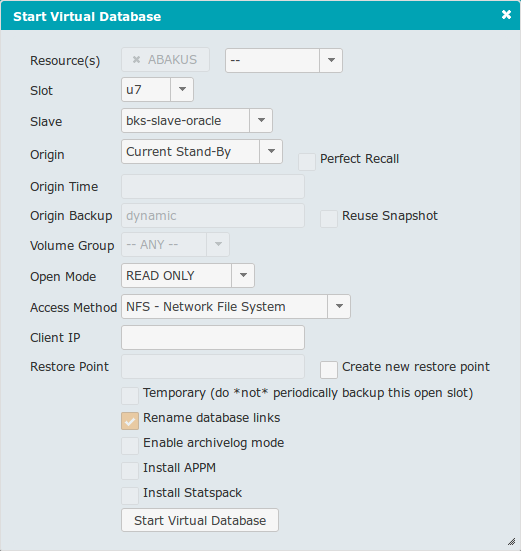
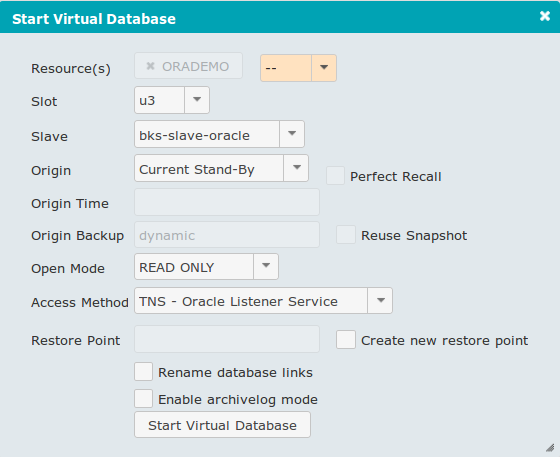
Basic and advanced "Start Virtual Database" window options and information:
- Resource(s)
-
Name of the resource that the selected backup or snapshot belongs to.
- Slot
-
Drop-down menu with the list of available slots. Slot in which virtual database will be opened. Selected slot’s resources will be used for opening virtual database. Only free slots with status
OFFLINEare available for selection. - Slave
-
Hostname of server where virtual database will be started.
- Origin
-
Historical Backup- can not be changed. Because the procedure of starting a database was started from a backup or snapshot this option is fixed and is alwaysHistorical Backup. - Perfect Recall
-
When this option is supported by the license and configured for a resource it can be used to start a virtual database from Current Standby. This option is useful when production database fails and Backup server’s Current Standby database is used in the role of temporary production database. If this option is available virtual database is restored up to production database’s last committed transaction.
- Origin Time
-
Date and time of the data in the selected backup or snapshot.
- Origin Backup / Backup ID
-
Unique identifier of the selected backup or snapshot. This backup will be used as origin for new virtual database. "Backup ID" is only displayed in basic mode when opening virtual databases from backups. The value of "Origin Backup" is set to
dynamicwhen starting virtual databases from slots as it is selected automatically. - Reuse Snapshot
-
A check-box that enables to reuse the originating snapshot is checked. In some cases when a snapshot is selected as an origin for virtual database, an option to reuse the originating snapshot is available and enabled. In such cases no additional snapshot will be generated as origin for the virtual database. This option is only available for snapshots with statuses
NORMALorFAILSAFE_<slot_id>. - Volume Group
-
A dropwodn list of volume groups that can be used to store virtual dabatabse’s files.
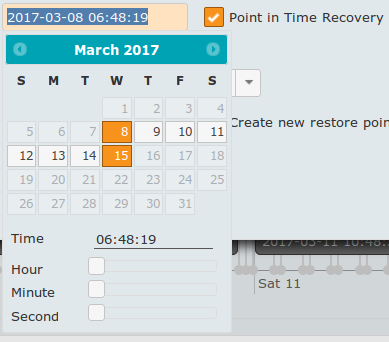
- Recover Until
-
A historical backup can be recovered from its origin time to the desired time if history for this time is stored on the Backup server for the selected resource. By default this field contains the same value as the field "Origin Time" does and it is locked for updating. To enable this field "Point in Time Recovery" check-box has to be checked. Date is selected by clicking on the calendar, time is set by moving the sliders back and forth. To finish and confirm entering "Recover Until" date and time, click anywhere outside the form for entering date and time. The selected date and time will be entered in the field. The newest point in time that can be set via this form is the time of the newest history stored on the Backup server.
- Point in Time Recovery
-
This checkbox has to be checked to enable "Recover Until" input field.
- Open Mode
-
Drop-down menu with 2 options:
READ ONLYorREAD WRITE. Each virtual database can be opened in read only or read write mode. Read only mode opens a consistent database that can be merged with production database, read write mode virtual database is different from its origin database and thus can not be used for recovering production database.
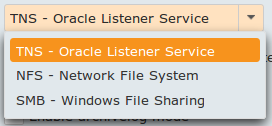
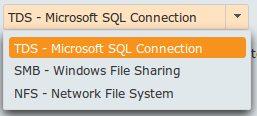
- Access Method
-
Drop-down menu with 3 options:
-
TNS - Oracle Listener ServiceorTDS - Microsoft SQL Connection: Virtual database is opened directly on Backup server. Users connect directly to the Backup server’s database. -
NFS - Network File System: Virtual database is opened on the Backup server to set it up and then closed. Database file-system is exported to the desired client. When this option is selected an additional input field called "Client IP" is displayed in the "Start Virtual Database" window. -
SMB - Windows File Sharing: Virtual database is opened on the Backup server to set it up and then closed. Database file-system is exported to the desired client. When this option is selected an additional input field called "Client IP" is displayed in the "Start Virtual Database" window.
-

- Client IP
-
Input field for entering IP address to which NFS export or SMB share will be made available. Only client with "Client IP" will be able to access the exported NFS or Samba share. IP address syntax is checked no additional checking of client IP accessibility is done.
- Restore Point
-
Name of the restore point. In some cases users will need to return to the same point in time more then once. If this point in time is different from any backup or stored snapshot it is advisable to create and store a new Restore Point in this exact point in time. This enables users to start virtual databases from it without the need for the Backup server and Deja-Vu to restore database from another backup or snapshot to this point in time. This saves users time and Backup server’s resources. To enable this input field check-box "Create new restore point" has to be checked.
- Create new restore point
-
Check-box for enabling "Restore Point" input field.
- Temporary (do not periodically backup this open slot)
-
Do not store archive log files and make backups for selected slot. By default slots hosting virtual databases are being backed up. This can take up significant amount of space. This option allows users to select not to store history for a slot. This also means that if something goes wrong with this database no history is stored.
- Rename database links
-
By default database links are not renamed. This option enables database links to be overridden (destroyed) as an extra layer of security. If database links are overridden users won’t be able to connect to other databases.
|
Note
|
This option is only available for database_oracle resources.
|
- Enable archivelog mode
-
By default database is running in nonarchivelog mode. If something goes wrong with the database while in nonarchiving mode (e. g. missing redo log files) it can not be opened any more and it is broken without the possibility to be repaired. If this option is enabled database runs in archivelog mode which increases the probability to repair the database taking administrative actions. The most common way to repair such a database is to use the snapshot created just before database was opened as a starting point and manually restore it to the last archive log.
|
Note
|
This option is only available for database_oracle resources.
|
- Install APPM
-
If this checkbox is checked "APPM" product is installed in slected slot after the database has been started. More about "APPM": https://www.abakus.si/en/products/software/appm .
- Install Statspack
-
If this checkbox is checked "Statspack" product is installed in slected slot after the database has been started. More about "Statspack": http://www.orafaq.com/wiki/Statspack .
- Start Virtual Database
-
After entering all necessary and optional information, click this button to start the process of opening Virtual Database.
|
Note
|
Starting a virtual database from snapshots that have statuses FAILSAFE or RUNNING is safe but does not guarantee that the virtual database will be started successfully. In most cases this operation will fail and slots used will be marked INVALID or INVALID_INTERNAL and snapshots created will be marked DESTROYED.
|
From Slot
This method allows starting virtual databases from the current stand-by database and from historical backups or snapshots. It is initiated from Slots tab which is described in Slots Tab chapter. Using this method allows users to open virtual databases from the most current version of the database called "Current Stand-By". The procedure of starting a virtual database from a slot is done by selecting a slot that has status OFFLINE and clicking button "Open" beneath the list of slots. This opens a new pop-up window called "Start Virtual Database". More about working with slots is described in Slots Tab chapter.
Pop-up window "Start Virtual Database" is the same as when starting virtual database from backups or snapshots as described in From backup or snapshot chapter. Because the procedure of starting a virtual database is started from a different source some options in "Start Virtual Database" pop-up window are different. Here only the differences are described all other options are described in the From Backup or Snapshot chapter:
|
Note
|
starting virtual databases from the current stand-by database is only available for database_oracle resources. For database_mssql resources this option is disabled.
|
- Resources
-
Because virtual database will be started from slot it does not refer to a specific backup or snapshot but rather to a specific point in time. This allows multiple virtual databases originating from multiple resources to be started at once, restored to the same point in time. It is hard to assure that data in multiple databases is synchronized after restoring them to the same time. Backup server does not guarantee that data in multiple virtual databases restored to the same point in time will be synchronized, it will rather try to restore databases to the same time in the past. This is useful when users have environments with multiple resources and want to set-up such environments to a certain point in time via one operation rather than having to start virtual databases separately for each resource. Using this approach is the only way to try to synchronize data of several resources from Current Stand-By database.
|
Note
|
starting virtual databases from multiple resources into the same point in time is only available for database_oracle resources.
|
database_oracle resources.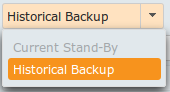
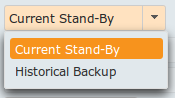
database_mssql resources.- Origin
-
When starting virtual database from a slot user interface allows selection of origin. There are two possibilities:
-
Current Stand-By- virtual database will be started from the Current Stand-By database running on Backup server meaning that virtual database will have most current state. When this option is selected "Origin Time" input field is disabled.
-
|
Note
|
starting virtual databases from the current stand-by database is only available for database_oracle resources. For database_mssql resources this option is disabled.
|
-
Historical Backup- virtual database will be started from one of backups stored on the Backup server for all resources selected in the resources section of "Start Virtual Database" pop-up window. Backup server will automatically select the closest usable backup for each selected resource and use it to restore virtual databases to the desired point in time. When this option is selected "Origin Time" input field is enabled, additionally input field "Recover Until" and check-box "Point in Time Recovery" are displayed.
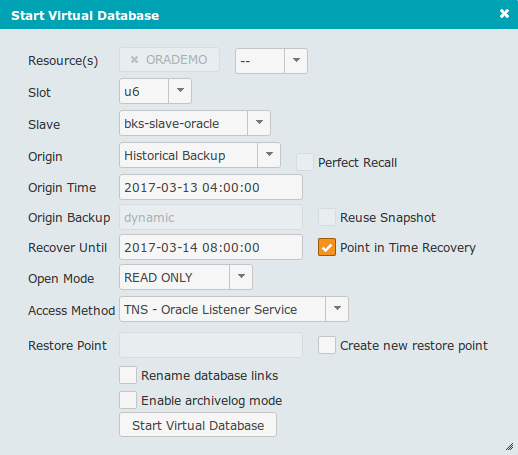
- Origin Time
-
This input field is only enabled when Origin is set to Historical Backup. In this input field time and date are entered as described in the "Reuse Snapshot" part of the From backup or snapshot chapter. This value determines the point in time from which user wishes to start virtual database. As this is not necessarily exact point in time at which a backup or snapshot was created, Backup server will search for the most suitable usable backup or snapshot to be used to start virtual database from.
- Origin Backup
-
Identifier of the originating backup. As described in previous item, Backup server will dynamically determine the optimal origin backup. Value of this field is set to
dynamicand fixed to this value. - Recover Until
-
As described in From backup or snapshot chapter, but it is not automatically set to "Origin Time" value, it must be manually set to the desired point in time. This field is disabled by default and it can be enabled by checking "Point in Time Recovery" check-box.
Standby Database Tab
Every database_oracle or database_mssql resource has a Standby Database from which all backups are made.
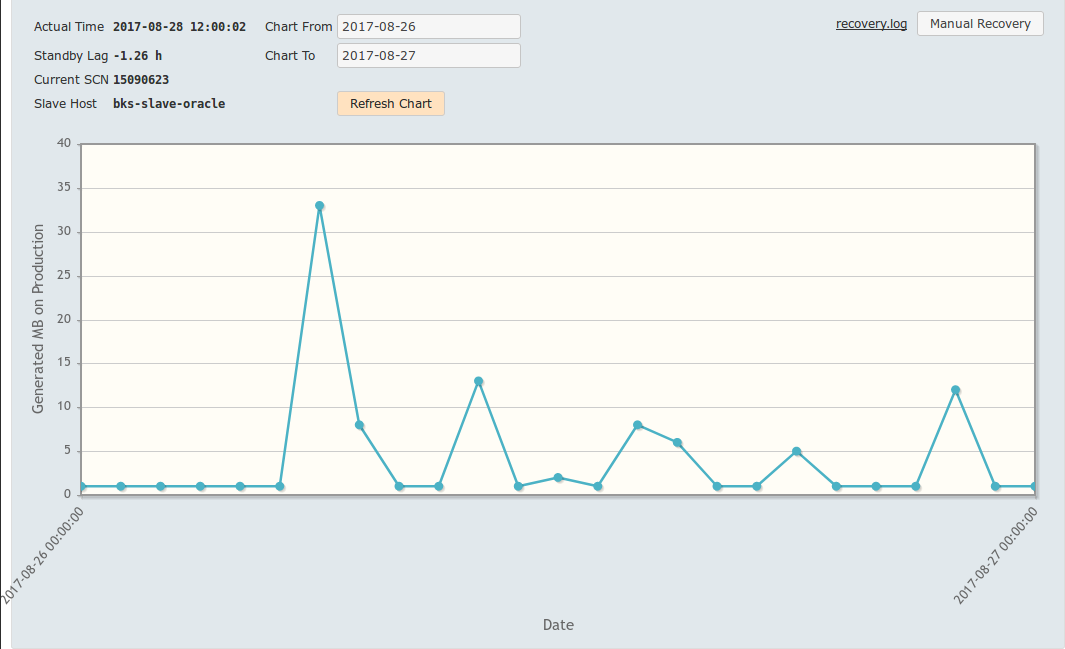
The majority of this page is occupied by a chart showing the rate at which archive logs are generated in MB. This graph shows the amount of changes to the production database in time. Above the chart there are fields showing additional information about standby database and a few fields for controlling the chart and its time frame.

In the chart there is a legend showing the name of the resource that this standby database belongs to and the color of its graph.
- Actual Time
-
Shows point in time at which standby database currently is. It should always be a few hours behind current time.
- Standby Lag
-
It shows the difference in time between Actual Time and current time. It is normal for this value to be somewhere between one and a few hours.
- Current SCN
-
It is the same as the Actual Time, but in more precise, database-specific format - the System Change Number.
- Slave Host
-
Hostname or IP address of the server where standby database is running.
- Chart From
-
This input field allows setting a starting point in time to be displayed on the chart.
- Chart To
-
This input field allows setting a ending point in time to be displayed on the chart.
- Refresh Chart
-
After pressing this button chart is refreshed using values entered in "Chart From" and "Chart To" input fields.
- recovery.log
-
Clicking this ling opens a new pop-up window called "Log Tail" displaying standby database recovery log file. More about Log Tail pop-up windows can be found in Log Tail chapter.
- Manual Recovery
-
Database recovery is started automatically periodically, but you can start it immediately using the "Manual Recovery" button. This button starts the recovery process and catalogs all files.
Exports Tab
This tab shows a list of all exports for the selected resource. Each time NFS - Network File System or SMB - Windows File Sharing is selected as "Access Method" when opening a virtual database an export is created. Another way to create exports is by using "Export Snapshot" button in "Backup Details" window. Exports provide database files to users. Each export is represented by a row in "Exports" tab table.

Elements displayed on this tab:
- Protocol
-
"Access Method" used to create this export. For user created exports this can be selected in "Start Virtuial Database" or in "Export Snapshot" popup windows. This field can have two different values
SMBorNFS. - Mount
-
File path to the folder containing files of a certain export.
- Access Mode
-
This value tells whether files in exported folder can be accesses in read-only (
R/O) or read-write (R/W) mode. - IP Address
-
IP Addresses of client computers that can access a certain export.
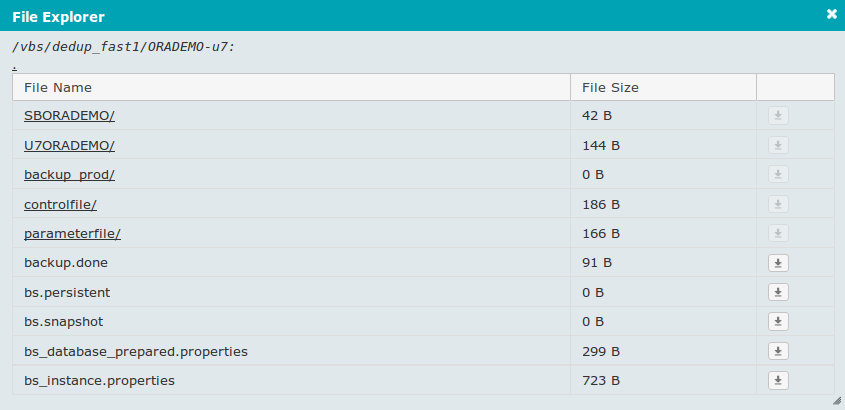
File Explorer
This is a shared component of Backup Server Interfaces. It is always displayed as a pop-up window on top of other Backup server GUI pages.
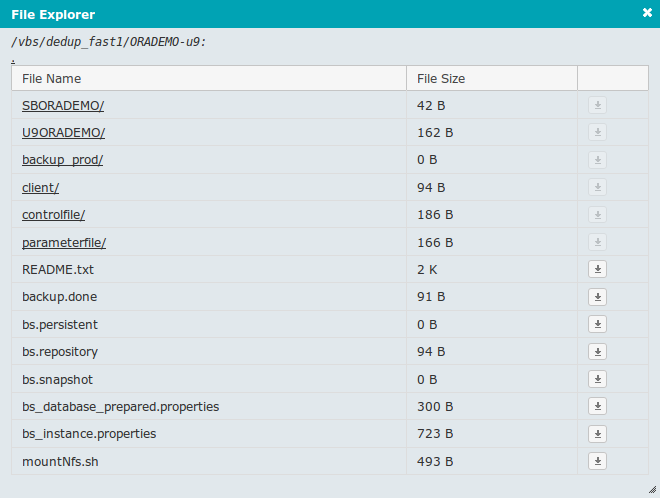
It allows browsing through folders and downloading files.
- File Explorer’s root path
-
In the top left corner File Explorer’s root directory path is displayed. This path is fixed and depends on the content that File Explorer is showing.
- Current directory path and parent directory link
-
Just below File Explorer’s root directory path, another path is displayed. This path is relative to File Explorer’s root directory path and it enables navigation to parent directory of the current path. While browsing through available folders using File Explorer value of this path is changed. When current path is at the top of File Explorer’s root directory, this link is displayed only as "." and it links to the current path.
- List of files and folders
-
The table displays files in folders in the current path. Table contains the following columns:
-
"File Name" - name of the file or folder represented by the row in the table.
-
"File Size" - size of the file represented by the row in the table.
-
Last column contains buttons for downloading files. Each row contains a button for downloading the file represented by the row in the table. As directories can not be downloaded buttons in the rows representing directories are disabled. Left clicking an enabled download button initiates a procedure for downloading a file in the web browser.
-
To close this pop-up window click the ![]() sign at the top right cornet of Log Tail pop-up window.
sign at the top right cornet of Log Tail pop-up window.
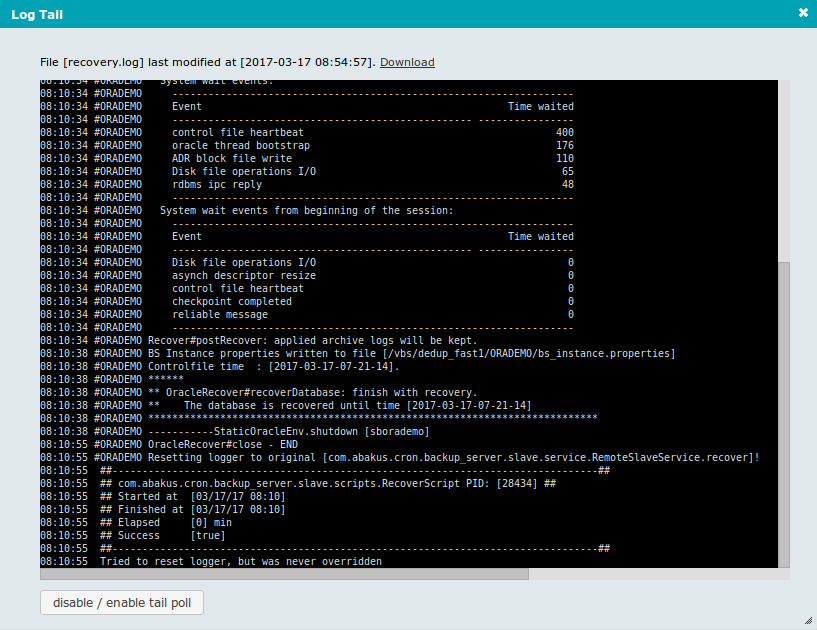
Log Tail
This is a shared component of Backup Server Interfaces. It is always displayed as a pop-up window on top of other Backup server GUI pages.
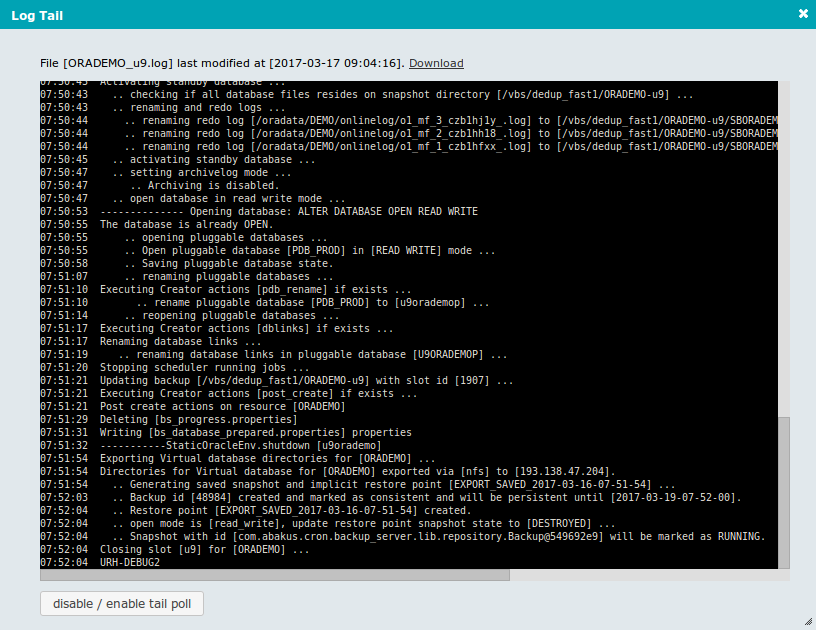
In this window tail of one of Backup server’s log files is displayed. By default tail is enabled meaning that if a new line is written into a monitored log file it is immediately shown at the bottom of the pop-up window. In some cases many changes are written into the monitored log file and consequentially also displayed in Log Tail window. In such cases it is hard for the user to follow what is printed on the screen. In such cases tailing can be disabled by clicking "disable / enable tail poll" button and enabled by clicking it again.

Above the part of the pop-up window showing log file contents some additional information and options can be found:
- Additional log file information
-
-
<LOG_FILE_NAME>- monitored log file filename. -
<LOG_FILE_LAST_MODIFIED>- date and time when monitored log file was last modified.
-
- Download
-
A link to the monitored log file that allows users to download it for future use.
To close this pop-up window click the ![]() sign at the top right cornet of Log Tail pop-up window.
sign at the top right cornet of Log Tail pop-up window.
Administration Interface
When a user with administrative privileges is logged into Backup server user interface an additional option to access administrative graphical interface is displayed to the left of the "My Session" menu.

Clicking this option displays the administration part of graphical interface which allows administrators to configure the following advanced options:
-
"Users" - user accounts management
-
"Subjects" - subjects management
-
"Software" - database software management
-
"Standby Load" - standby database load overview
-
"Audit" - Backup server audit log
-
"Checks" - Standby database checks

After entering Administration part of the graphical interface a link called "Resources" is displayed in the user menu that for returning back to the Resources part of GUI.
Users Tab
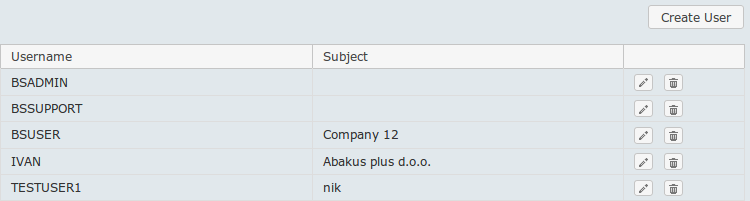
When administration part of user interface is accessed by default "Users tab" is displayed. It displays a list of all users with options to manage existing and add new users. Each row in the list represents one user account. Information displayed:
- Create User
-
A button for creating a new user
- Username
-
User account name
- Subject
-
A subject that the user represented in a row belongs to.
- User management options
-
Two buttons are displayed in each row:
-
 - button for for editing user configuration. Clicking this button opens a popup window for editing selected user’s data. More about editing user configuration is explained in the next chapter.
 -
 - button for deleting user represented by the row.
-
|
Warning
|
Clicking the delete button instantly deletes the user without any additional confirmation dialogs! |
Creating and editing users
At the top of the list of users in the "Users" tab a button called "Create User" is located. Clicking this button opens up a new popup window that allows creating a new user.
This window accepts the following data:
- Username
-
Name for the user being created.
- Subject
-
A dropdown menu for selecting a subject for the user being created. More information on how to manage subjects can be found in the Subjects Tab chapter.
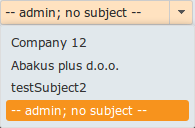
|
Note
|
When no subject is selected for a user, this user role is Administrator. To create an administrator option -- admin; no subject -- must be selected.
|
- Password
-
A password input field for the user being created.
- Confirm Password
-
Password confirmation for the user being created. This must match the value of "Password" input field.
- Create User
-
A button to confirm user creation and close the popup window. This button is only available when popup window has been opened by clicking "Create User" button.
- Edit User
-
A button to confirm username or subject change. This button is only available when popup window has been opened by clicking
button. - Change Password
-
A button to confirm password change. This button is only available when popup window has been opened by clicking
button.
|
Note
|
All errors during user creation process are displayed in notification area of the main window of administration interface. |
Subjects Tab
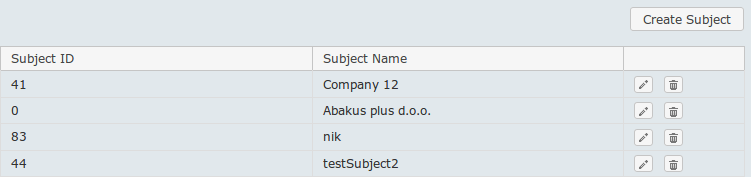
In this tab a table with a list of all subjects is displayed. Each subject can have access to one or more Backup server’s resources. By setting subjects to users administrators can manage user resource access. Elements displayed on this page:
- Create Subject
-
A button for creating new subject. Clicking this button opens a new popup window called "Create / Update Subject" that allows adding a new subject.
- Subject ID
-
An integer representing unique identification of a subject.
- Subject Name
-
Name of a subject. It has to be unique.
- Subject management options
-
Two buttons are displayed in each row:
-
- button for for editing subject information. Clicking this button opens a popup window called "Create / Update Subject" which allows editing selected subject’s data. More about editing subjects is explained in the next chapter.
-
- button for deleting subject represented by the row. Clicking this button instantly deletes subject.
-
|
Warning
|
Clicking the delete button instantly deletes the subject without any additional confirmation dialogs! |
|
Note
|
Only subjects that have no users can be deleted! If this is not true, the following message is displayed in the notification area. |

Creating new subjects
At the top of the list of subjects in the "Subjects" tab a button called "Create Subject" is located. Clicking this button opens up a new popup window called "Create / Update Subject" that allows creating a new subject.
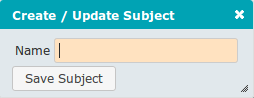
This window consists of the following elements:
- Name
-
Input field for entering name for the subject being created.
- Save Subject
-
A button for confirming subject creation.
Editing subjects
Each row of the list of subjects contains a button ![]() . Clicking this button opens a popup window called "Create / Update Subject" which is used for editing selected subject’s properties.
. Clicking this button opens a popup window called "Create / Update Subject" which is used for editing selected subject’s properties.

The window consists of the following items:
- Name
-
Input field for entering name for the subject being created.
- Resources Area
-
This area consists of two lists of resources and buttons for transferring those resources between the two lists. The left list is a list of all resources that this subject is not authorized to use. The right list is a list of all resources that the subject is authorized to use. The following buttons are available:
-
 - this button is used for adding a single resource. A resource has to be selected from the list of available resources before pressing this button.
 -
 - this button is used for adding all resources.
 -
 - this button is used for removing a single resource. A resource has to be selected from the list of authorized resources before pressing this button.
 -
 - this button is used for removing all resources.
-
- Save Subject
-
A button for confirming subject update operation.
Disk volumes Tab
This tab is used for displaying Disk Volume information and setting some basic Disk Volume settings. Disk Volumes represent physical storage devices that contain filesystems used by Backup server. Disk volumes are configured by Backup server support presonnel. Only a few parameters can be edited using Backup server GUI.
Each backup server typically consists of fast SSD and slower SATA disks and typically the capacity of slower disks is much greater than the capacity of faster disks. Therefore slower disks can store longer history and faster disks enable quicker virtual database manipulation. This is why there are two different deduplication storage volume groups one called fast and the other called slow.
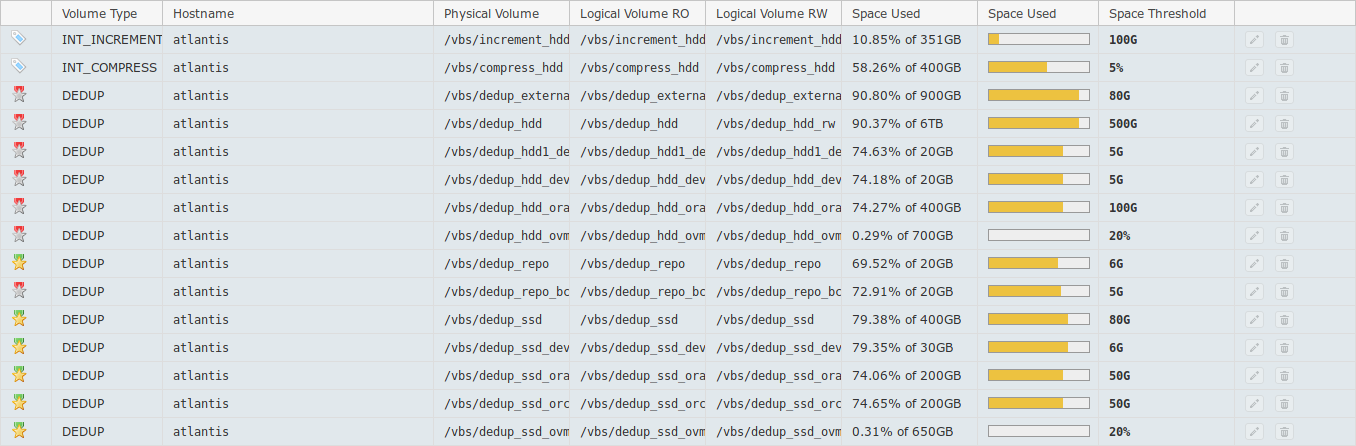
Data displayed on this tab:
- Volume icon
-
Each Disk Volume used for deduplication storage has an icon representing it. This icon is displayed in rectangles representing backups and snapshots in Backups tab.
- Volume Type
-
Type of Disk Volume.
- Hostname
-
Hostname of the storage provider hosting Disk Volume.
- Physical Volume
-
Physical Volume name.
- Logical Volume RO
-
Path to deduplucated read only volume.
- Logical Volume RW
-
Path to deduplucated read write volume.
- Space Used
-
Information on Disk Volume space usage.
- Space Used
-
Graphical representation of Disk Volume space usage.
- Space Threshold
-
When available storage space is reduced below this threshold internal storage space cleaning mechanisms are triggered.
- Edit Disk Volume button
-
A button for editing Disk Volume properties. Clicking this button opens a popup window for editing Disk Volume parameters. This is described in the following part of this chapter.
- Delete Disk Volume button
-
A button for deleting a Disk Volume.
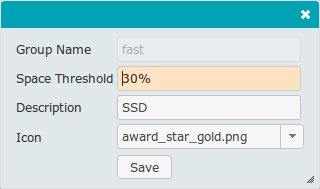
This popup window displays the following volume parameters:
- Volume name
-
Disk volume name. This setting can not be changed and is set-up by Backup server support perosnnel.
- Space Threshold
-
A threshold to trigger Backup server’s internal space cleaning mechanisms. The value of this field can be set in percentage or amount of empty space required. When this variable is not expressed in percentage the following units can be used:
-
M: for megabytes
-
G: for gigabytes
-
T: for terabytes
-
|
Note
|
Backup server’s space cleaning mechanisms are used to prevent Backup server’s storage to become full. If backup server storage becomes full, backup server can not perform its basic functionality. Users have to be carefull not to set this setting too high, because Backup server’s space cleaning mechanisms delete history from Backup server. To prevent deleting too much data a mechanism that reduces the value to maximum amount that is equal to 50% of "Space Capacity" is implemented. |
- Description
-
A descriptive name for Disk Volume. This name is displayed within Backup Details popup window described in Backup Details chapter.
- Icon
-
A dropdown menu of predefined icons to represent Disk Volume.
- Save button
-
Pressing this button stores configured settings and closes popup window.
Hosts Tab
Each Backup server is compised of more than one virtual host. There is one "master" host that stores all the backups and snapshots. Besides the master one or more "slave" hosts can exist. Slave hosts are used for starting various virtual databases. Virtual databases need different database softwares to run and different environments (OS) to run, therefore different hosts are needed.

Data displayed on this tab:
- Host ID
-
Unique identificator of a host.
- Hostname
-
Host’s hostname.
- Role
-
Tells whether this host is the master or one of the slaves.
- Host IP
-
Host’s IP Address.
- Dedup Mount Point
-
Path to deduplucated volume group where applicable. This setting is not applicable to all host roles.
- Compress Mount Point
-
Path to compressed volume group where applicable. This setting is not applicable to all host roles.
- Local Work Folder
-
Host’s local path where non-critical temporary files are stored. If this value is not defined then these non-critical temporary files are stored on master’s compressed volume and sotring them on master taking up valuable master storage and network resources.
- Resource Types
-
Type of resources installes on a slave host.
- Edit Host button
-
A button that opens a new popup window called "Edit Host" for changing host parameters.
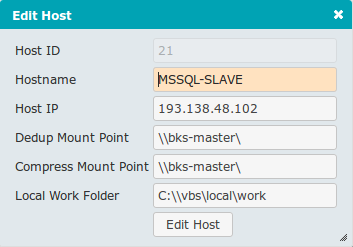
This popup window displays the following host parameters:
- Host ID
-
Host’s unique identificator.
- Hostname
-
Host’s hostname.
- Host IP
-
Host’s IP Address.
- Dedup Mount Point
-
Path to deduplucated volume group where applicable. Not applicable to all host roles.
- Compress Mount Point
-
Path to compressed volume group where applicable. Not applicable to all host roles.
- Local Work Folder
-
Host’s local path where non-critical temporary files are stored. If this value is not defined then these non-critical temporary files are stored on master’s compressed volume and sotring them on master taking up valuable master storage and network resources.
- Edit Host button
-
Pressing this button stores configured settings and closes popup window.
Software Tab
This tab displays a table with a list of one or more database software versions for each resource on the Backup server. Each database requires a software to run it. During the lifetime of a database, database tends to get upgraded to newer versions of software. Because Backup server stores a long history of a database it is normal for a resource to have more than one software version installed. On this tab those different software versions are displayed, can be added, changed or deleted. When opening a virtual database this software is used to start the database.
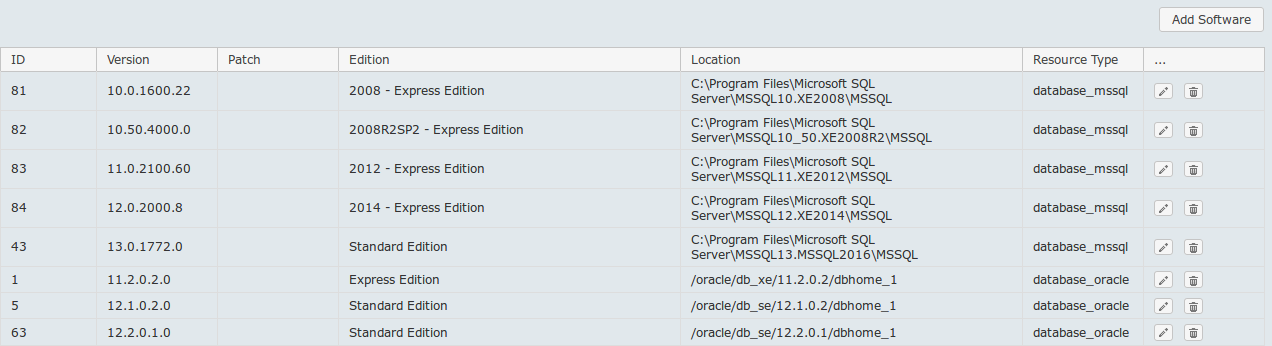
Elements displayed on this tab:
- Add Software
-
A button for adding new software. Clicking this button opens a popup window called "Create / Update Software" for adding new software.
- ID
-
An integer representing unique identification of a software.
- Version
-
Version of the software.
- Edition
-
Software database edition.
- Location
-
Folder on Backup server slave host containing the software. For Oracle resources this is $ORACLE_HOME and for Microsoft SQL Server this is the folder where SQL Server common files are located.
- Resource Type
-
Type of the resource that uses this software.
- Software management options
-
Two buttons are displayed in each row:
-
- button for for editing software properties. Clicking this button opens a popup window called "Create / Update Software" which allows editing selected software’s properties. More about editing softwares is explained in the next chapter.
-
- button for deleting software represented by the row. Clicking this button instantly deletes software.
-
Creating or updating software
At the top of the list of software in the "Software" tab a button called "Create Software" is located. Clicking this button opens up a new popup window called "Create / Update Software" that allows adding a new software.
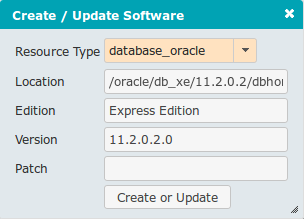
This window accepts the following data:
- Resource Type
-
Dropdown menu for selecting resource type.
|
Note
|
Dropdown contains some options that are currently not fully supported through Backup server GUI. Currently Backup server GUI only supports database_mssql and database_oracle as resource type through GUI.
|
- Location
-
Input field where folder on Backup server slave host containing the software is entered. For Oracle resources this is $ORACLE_HOME and for Microsoft SQL Server this is the folder where SQL Server common files are located.
- Edition
-
Input field containing information about the edition of the database software installed. This field is only informational and does not impact Backup server functionality.
- Version
-
Input field containing information about the version of the database software installed. This field is only informational and does not impact Backup server functionality.
- Patch
-
Input field containing information about the version of the database software patch installed. This field is only informational and does not impact Backup server functionality.
- Create or Update
-
A button to finish the process of adding new or updating existing software.
Resource Types Tab
This tab displays a list of one or all available resource types. Resource types are predefined by support personnel. Only configurations for resource types can be changed using this tab.

Information displayed in this tab:
- ID
-
Unique resource type identifier.
- Resource Type
-
Sring representing a resource type name.
- License
-
Ceratin resource types can have additional licensed functionalities enabled. This field shows information on which licenses are installed for certain resource types.
- Configuration button
-
Button that opens a window called "Configuration Editor". More on confguration editor can be found in Configuration Editor chapter.
Standby Load Tab
Every database_oracle or database_mssql resource has a Standby Database from which all backups are made.
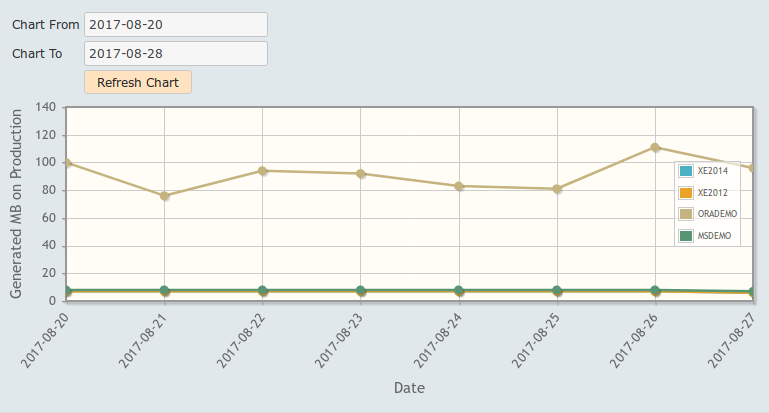
The majority of this page is occupied by a chart showing the rate at which archive logs are generated in MB. This graph shows the amount of changes to the production database in time. Above the chart there are fields showing additional information about standby database and a few fields for controlling the chart and its time frame. It shows exactly the same information as is displayed on the Standby Database Tab but for all resources of types database_oracle and database_mssql in a single graph.
On the chart there is a legend showing the name of the resource represented by a chart color.
- Chart From
-
This input field allows setting a starting point in time to be displayed on the chart.
- Chart To
-
This input field allows setting a ending point in time to be displayed on the chart.
- Refresh Chart
-
After pressing this button chart is refreshed using values entered in "Chart From" and "Chart To" input fields.
Audit Tab
Backup server audit log is displayed within this tab. Audit log contains information about events happening on Backup server initiated through Backup server GUI. Events are represented in a table where each row belongs to one audited event. GUI only shows a limited number of audit log events, the complete Backup server audit log file can be downloaded by a link called "backup-server-audit.csv" which can be found just above the table.
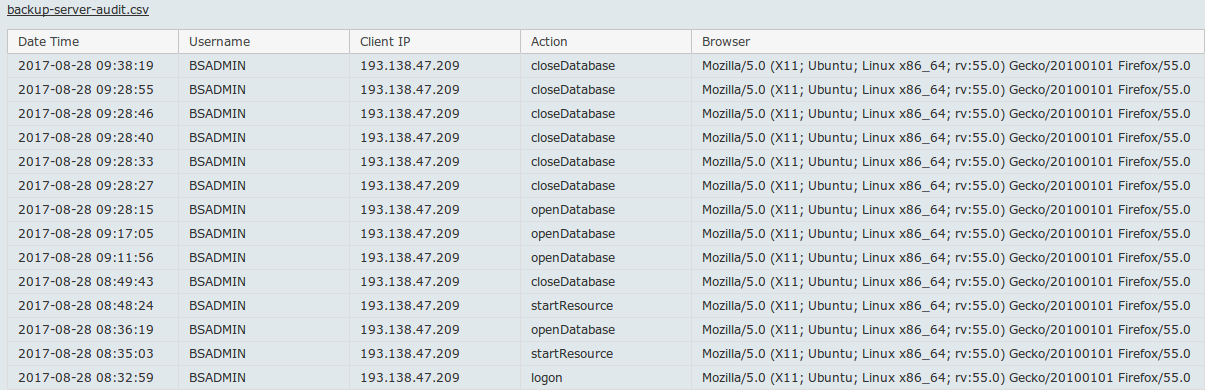
The following information is displayed in the audit log events table:
- Date Time
-
Exact time of the event.
- Username
-
Username of the user that caused the event.
- Client IP
-
IP address of the client computer that was running Backup server GUI.
- Action
-
Type of the event.
- Browser
-
Type and version of the web browser that was used to run Backup server GUI.
Checks Tab
Backup server periodically performs various checks that monitor Backup server general health and resources states. In this tab list of all checks and its statuses are displayed. Each row of the table represents one check. Detailed information can be displayed for each check.
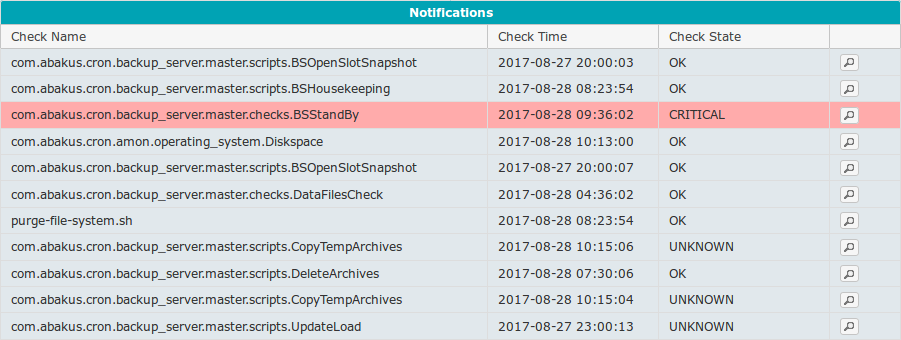
|
Note
|
If checks with statuses WARINING or CRITICAL are present in this tab, maintainers of the Backup server should be notified as soon as possible. Check details information should be included in the notification if at all possible.
|
When there is at least one check with status WARINING or CRITICAL this state is represented in the Notification Area of GUI which is explained in more details in Notification Area chapter.
Information displayed in the table of checks:
- Check Name
-
Unique name of an individual check.
- Check Time
-
Time when the check was last performed.
- Check State
-
State of the check when it was last performed.
- Additional information
-
A button in the last column of the table (
 ). Clicking this button opens a popup window titled by the name of the check for which details are displayed.
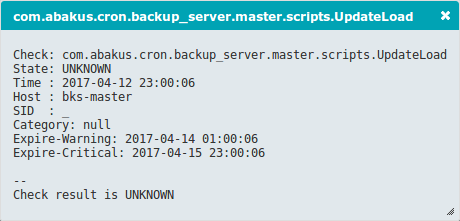
Depending on the individual checks, different information is displayed in this popup window. When notifying Backup server maintainer of the problematic situation observed in the checks tab information from check details popup window should be included.
Restore Scenarios
OVM: Virtual Disk Image Restore
If you have lost single or multiple virtual image files, you can restore them using this procedure.
Step 1: Backup Server
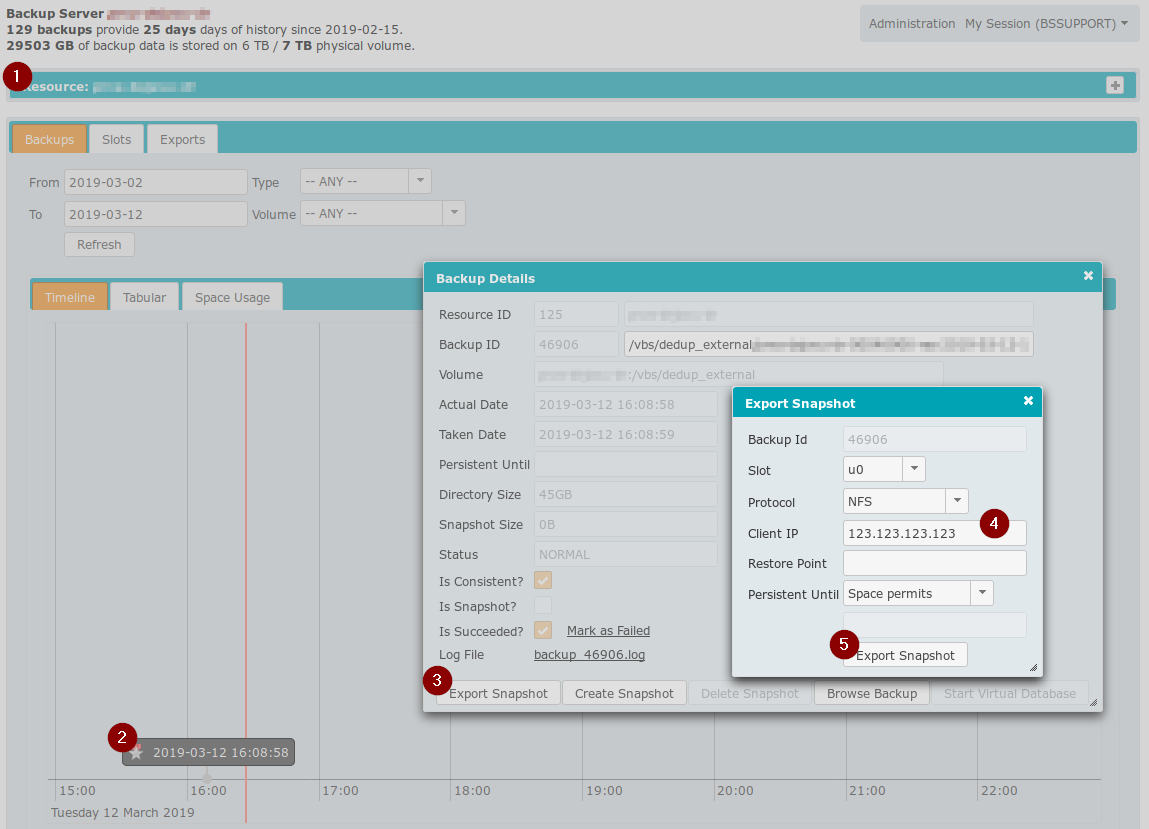
Log into Backup Server GUI as explained in Login section and follow the screenshot above:
-
Select the resource which represents the virtual machine that has lost the virtual image file(s)
-
On Timeline, select the backup from time you wish to restore to
-
In Backup Details, click on Export Snapshot.
-
Enter OVS Server IP on which the VM should be running into "Client IP" field.
-
Click Export Snapshot
-
Select the prepared slot and click "Status" button
-
Slot Status will offer "mountNfs.sh" script, which you should download
This procedure will expose virtual disk images via NFS to selected OVS Server.
Step 2: OVM Manager
Log into OVM Manager and make sure that:
-
Virtual machine that has lost the image file is shut down
-
OVM Repository is presented to OVS on which this VM should be running
Step 3: OVS Server
Log into selected OVS Server and perform the following:
-
Upload the
mountNfs.shscript and execute it as root -
Copy the image from mounted NFS path to selected OVM Repository
Example:
# ./mountNfs.sh
# cp /vbs/dedup_external/res_name-00046948-u0-rw-2019-03-13-10-01-01/0004fb0000120000a9a59f89be1582bc.img /OVS/Repositories/0004fb00000300006916dc2f65bd6862/VirtualDisks/0004fb0000120000a9a59f89be1582bc.img
Now you can start you VM with restored disk image.
OVM: Virtual Machine Restore
If you have lost complete Virtual Machine follow the steps in OVM: Virtual Disk Image Restore.
Once you you mount NFS share as described earlier, you will find file named vm.cfg. You can either:
-
open this file with text editor and create new VM based on information from the file
-
copy this
vm.cfginto OVM Repository (into correct folder, only possible if you know exactly which since OVM does not use friendly names) and execute "Rediscover Server"
We generally prefer the first option.